If you are a regular reader of IntoWindows, you probably know that I had written an article titled how to create live XP/Vista CD/DVD/USB just a few weeks ago. Few readers had asked me to write a simple article which shows the making of Live XP without any hassle. So, I am writing this new guide for XP lovers.
The art of creating Windows XP live CD
Here I am re-writing the article by assuming that you are going to create Live XP CD. To create a live XP CD, you need to have an internet connection. If you don't have an internet connection you need to wait for a few days as we will write about creating Live USB drive using another method. Make sure your system is connected to the internet.
Essentials:
1. Winbuilder
2. Windows XP CD
3. Internet Connection
4. Blank CD
Step 1. Download Winbuilder (Free) from here, extract the zip file to a folder called “Live XP” on your Desktop (assuming that you have a minimum of 700MB free space on your C Drive). You can even choose any other drives or folders to extract the Winbuilder zip file. Make sure you have enough amount of free space before proceeding further.
2. Run Winbuilder.exe file from the Live XP folder, below is the welcome screen you will see for the first time. Download screen is the screen where you need to choose the tools, drivers and other applications required for the live CD.
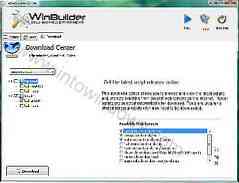
3. Switch to Download tab, uncheck the box named “Optional”, and click the Download button located at the bottom left of the pane to start the download of essential scripts and tools for your XP live CD.

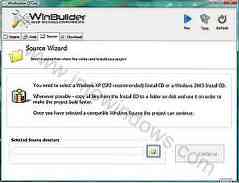
4. Once Winbuilder finishes the downloading process, it will show you the below screen. Click on Play button located at right top.

5. Insert your Windows XP CD into the CD/DVD drive and browse the same from the Winbuilder (Refer screenshot).
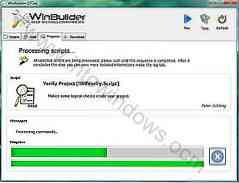
6. Click Continue button to start the live CD building process. It will take a few minutes to finish the process. If Winbuilder process prompts any confirmation message, click “yes” or “Ok” to continue the building process.
7. Once it finishes building Live XP image, you need to insert a blank CD so that it burns the Live XP image file into the blank CD. Keep the burn speed at minimum to get the best results.

8. If you have followed the procedure neatly, you will have a Live XP CD in your hand.
9. Once you get the Live XP CD, you can insert and check the new Live XP CD.
PS: I tried to use the latest version of Winbuilder before the proceeding to the older version which I used in this guide. The reason is this version is stable than the newer version like XP. So, I recommend the stable version instead of the BETA.
If you have any problems in following the above procedure, feel free to ask your doubt in the form of comments. And finally, don't copy this article to any other sites or forums without the permission and backlink.


