Understanding the disk layout
If you have a new disk attached to your system, or to your VM, a handy command to list all the attached block storage command is quite helpful. The following command lists all the block storage devices attached to the system. This includes raw disks, primary partitions, logical partitions and even network attached storage.
$lsblk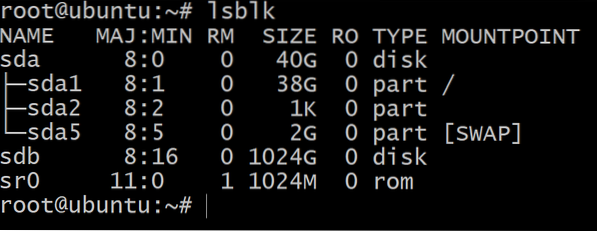
Here, we have attached a new 1TB disk which shows up as device sdb. The sda device above it is where the operating system is installed and you can see that it has a root partition and a swap partition.
The second disk, however, has no partitions and is not formatted with a filesystem. From here on, you can do two things:
- Use the entire disk and install the filesystem on top of it.
This is as simple as running: $mkfs.xfs /dev/sdb - Or, you can partition it into more manageable chunks for which we need to use the parted utility. We will be following this procedure.
Partitioning the disk
To start partitioning the disk, you can either use gparted which is a graphical utility. Nevertheless, let's use the universal command-line interface so that it works across platforms in the same way.
First thing to understand here is that the disk can be interfaced with a special file, known as the device node, which will be used to refer the actual disk. In our case the device node is sdb and its full path is /dev/sbd, it might be under a different name in your case. This file points to the physical device, but it would not actually contain the data that is stored in the disk. That information will show up in the directory where you mount the device (more on that later).
To get started with partitioning, enter:
$parted -a optimal /dev/sdbThis would start the parted command-line utility with our new disk in focus.

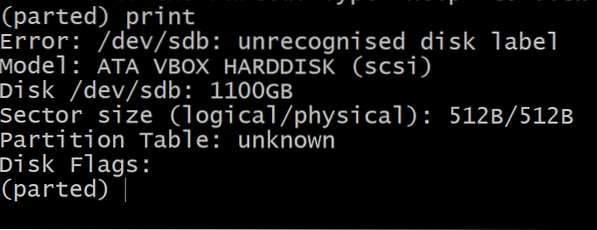
Typing print would list all the various partitions on the disk, but since there are none, we will see an error message.
Now let's add a gpt label (along with a gpt table) to the disk.
(parted) mklabel gptThis will give your disk (and its partitions) a globally unique ID which is really crucial if you are going to plug the disk out and insert it via a different physical port. Having a globally unique ID removes that explicit dependence on the port number that most operating systems rely on when identifying resources.
Having labeled the disk, you are ready to create the first partition on it.
(parted)unit GB(parted)mkpart primary 0 200
The first command sets the units in GB which is more convenient and the second command creates a primary partition from the start of the disk (except a small reserved memory in the beginning) till the 200th Gigabyte. Let us verify this.
(parted)print
Now you can exit the parted utility by entering quit. And we can see that the layout for block devices have a new member.
$lsblk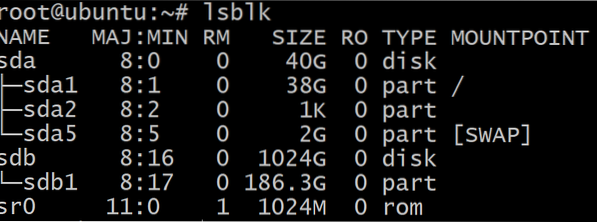
A partition has emerged as sdb1 from the sdb disk and it has its own device node and it is ready to be used.
Note: The size of the partition as shown in lsblk command differs from the parted utility's output and this is because the former consider 1024MB to be equal to 1GB, whereas, the latter takes 1000MB as 1GB.
Making and mounting XFS filesystem
When it comes to making any filesystem on Ubuntu, the most common command is of the type mkfs.filesystemName in case of XFS the command is simple.
$mkfs.xfs /dev/sdb1Where, sdb1 is our target partition.
Now we have a partition and a filesystem format for it. But it is still not a part of the system's directory tree (loosely called as the root filesystem). We need to mount it, and traditionally the /mnt/ directory is used for this, although you can do it anywhere.
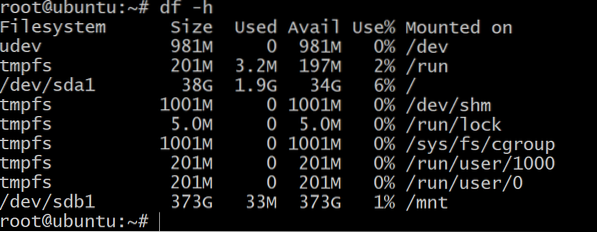
$mount /dev/sdb1 /mnt/$df -h

Resizing the partition
If you have enough unallocated space, then resizing the filesystem to occupy the extra space is done in two steps:
- Resizing the partition: Let's unmount the filesystem first: $umount /dev/sdb1
Going back to the parted utility you can see the state of current state of the disk.
$parted -a optimal /dev/sdb
(parted) print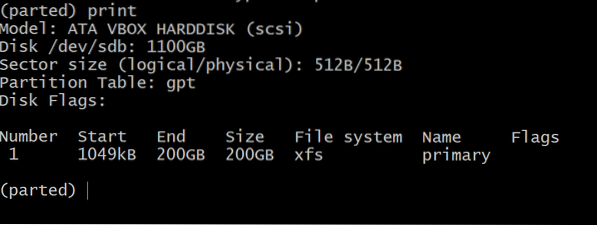 The partition number is 1 and we need to refer to the partition with this number.
Now, to grow the partition enter the command:
(parted) unit GB
(parted)resizepart 1 400
(parted)quitSo first we set the unit to GB and then the second command says get the partition 1 and move its end all the way to 400GB. So the end of the partition moves further away.
- The partition has grown, but the filesystem is not aware of it. If you mount it and see its size, it will still be the same. To grow the filesystem, this is the final step. $mount /dev/sdb1 /mnt
$xfs_growfs -d /dev/sdb1The second command literally grows the filesystem and the -d flag tells it to go all the way to the end of the partition.
That's it! Now if you see the filesystem information it will reflect the increase in its size.
Most of the steps are similar for other filesystems like ext4, ext3, ufs, etc. The only noticeable exception is that of zfs and you can learn more about that here.


