Installing VSFTPD
VSFTPD (Very Secure FTP Daemon) is a software program used to configure FTP on a server. In this tutorial, VSFTPD will be used to configure the FTP server on the machine. Before installing VSFTPD, update the repositories in your server by issuing the following command.
[email protected]:~$ sudo apt-get update -yNext, install VSFTPD using the following command.
[email protected]:~$ sudo apt-get install vsftpd -yFinally, verify the installation by checking the version of vsftpd with the following command.
[email protected]:~$ vsftpd -v
The above command will output the version of vsftpd if the installation is successful.
FTP in Active Mode
In Active mode, the FTP client starts the session by establishing the TCP control connection from any random port on the client machine to port 21 of the Server. Then, the client starts listening on a random port X for a data connection and informs the server via TCP Control connection that the client is waiting for the data connection on port X. After this, the server establishes a data connection from its port 20 to the port X on the client machine.
A problem can arise where the client is behind a firewall and port X is blocked. In this case, the server is not able to establish a data connection with the client. To avoid this problem, the FTP server is mostly used in Passive mode, which we will discuss later in this article. By default, VSFTPD uses Passive mode, so we will have to change it to Active mode.
First, open the VSFTPD configuration file.
[email protected]:~$ sudo nano /etc/vsftpd.confAdd the following line to the end of the file.
pasv_enable=NO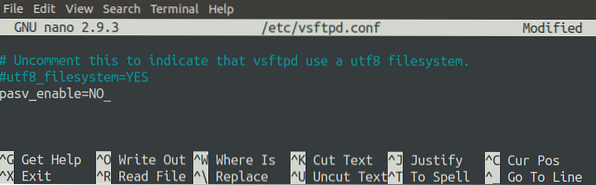
Also, be sure that the 'connect_from_port_20' option is set to 'YES.' This option ensures that the data connection is established on port 20 of the server.

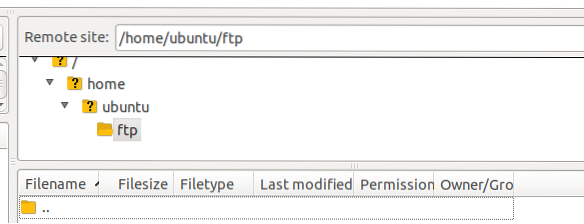
Next, create a directory that the FTP server will use to store files. For this tutorial, we will configure '/home/ubuntu/ftp/' as the root path for the FTP server.
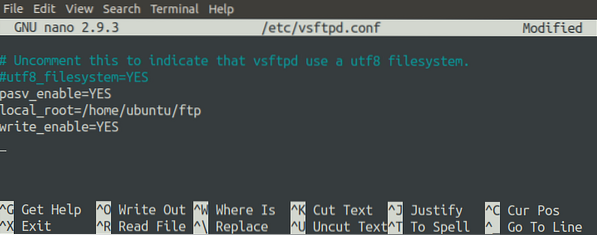
[email protected]:~$ sudo mkdir /home/ubuntu/ftpNow, specify this directory in the configuration file by changing the 'local_root' option. The following parameter will configure the root path of the server.
local_root=/home/ubuntu/ftp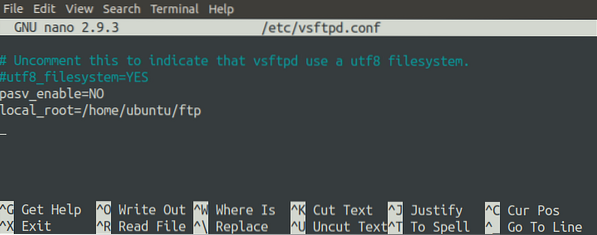
The 'write_enable' option must be enabled to allow users to write to the FTP server.
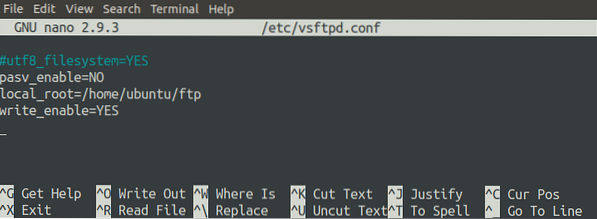
Every time you change the configuration file, always restart the server.
[email protected]:~$ sudo systemctl restart vsftpdSetting a Password for a User
The FTP client connects with the server using a username and password. Set the password for your user on the machine using the following command.
[email protected]:~$ sudo passwd ubuntuThe above command will ask for the password for the 'ubuntu' user.
Configuring the Firewall for Active Mode
If FTP is used in Active mode, the FTP server will use two ports to communicate with the client, ports 21 and 22. Port 21 is used to pass commands to the client, and Port 20 is used to transfer data to any random port of the client. We will use ufw to configure the firewall on the server. Install ufw using the following command.
[email protected]:~$ sudo apt-get install ufwNow, on the server side, we will open ports 20, 21, and 22 (for the SSH connection).
[email protected]:~$ sudo ufw allow from any to any port proto tcp
Enable and check the status of ufw using the following commands.
[email protected]:~$ sudo ufw enable[email protected]:~$ sudo ufw status
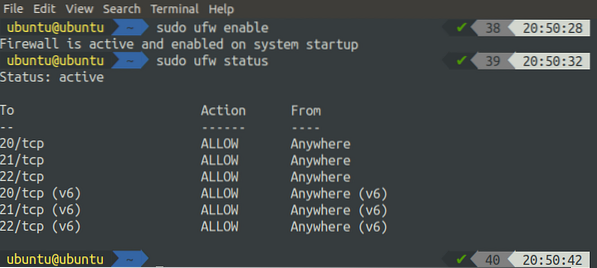
NOTE: if you are configuring your FTP server on the cloud, you will also need to allow ports 20, 21, and 22 in the security group.
WARNING: Always enable port 22, along with the required ports, before enabling ufw on the remote system. By default, UFW blocks traffic from port 22, so you will not be able to access your remote server using SSH if you enable ufw without allowing traffic from port 22.
Installing the FTP Client
Now, our server is configured in Active mode, and we can access it from the client side. For the client application, we will use FileZilla, an ftp client application. Install FileZilla using the following command.
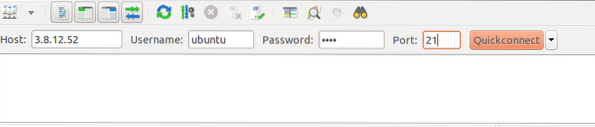
[email protected]:~$ sudo apt-get install filezilla -yOpen the FTP client application and enter the public IP address and other credentials of the FTP server.

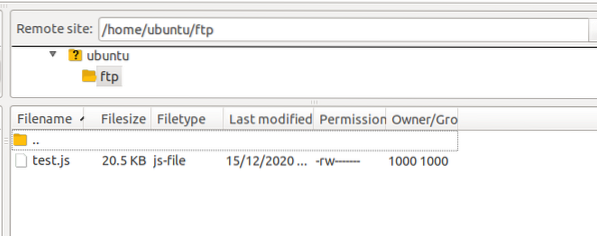
When you click 'Quickconnect,' you will connect to the FTP server and automatically be taken to the directory specified in the 'local_root' option in the '/home/ubuntu/ftp' configuration file.
Problems in Active Mode
Using FTP in Active mode raises problems when the client is behind the firewall. After inputting the initial control commands, when the server creates a data connection with the client on a random port, the port may be blocked by the firewall on the client, causing the data transfer to fail. FTP can be used in Passive mode to resolve these firewall problems.
FTP in Passive Mode
In Passive mode, the client creates a control connection with the server on port 21 of the server. The client then sends the special 'PASV' command to inform the server that the data connection will be established by the client instead of the server. In response, the client receives the server IP and random port number (this port number will be configured on the server). The client uses this IP and port number to create a data connection with the server. In Passive mode, both the data and control connections are established by the client, so that the firewall does not disturb the communication between the client and the server.
Open the FTP configuration file in your favorite editor.
[email protected]:~$ sudo nano /etc/vsftpd.confSet the 'pasv_enable' option to 'YES' in the file so that the server can communicate with the client in Passive mode. Also, set the 'local_root' option to specify the root directory of the server and set the 'write_enable' option to 'YES' to allow users to upload files to the server.
As previously discussed, the data connection is established by the client, and the server sends its public IP and a random port to the client to create a data connection. This random port on the server can be specified from a range of ports in the configuration file.
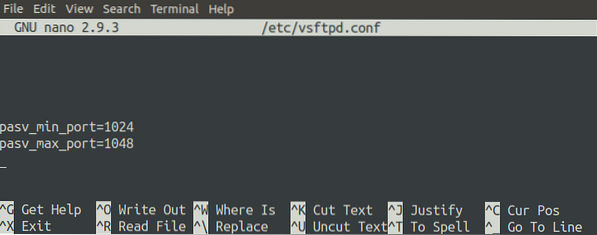
The data connection between the server and the client will be established on a port between 1024 and 1048. Restart the FTP server after changing the configuration file.
[email protected]:~$ sudo systemctl restart vsftpdConfiguring the Firewall in Passive Mode
If we use FTP in Passive mode, the data connection will be established over any port from 1024 to 1048, so it is necessary to allow all these ports on the FTP server.
[email protected]:~$ sudo ufw allow from any to any port proto tcp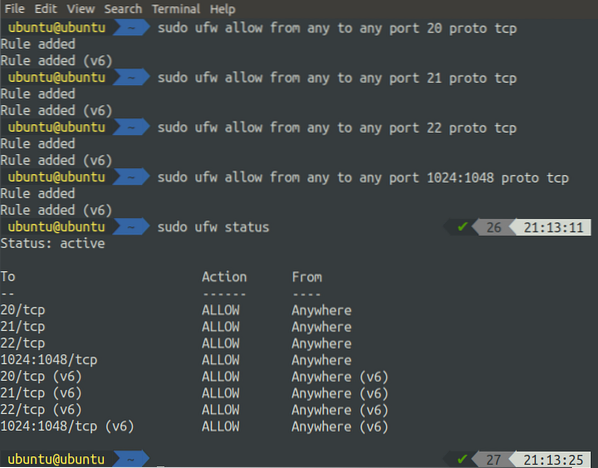
After allowing all the ports on the firewall, activate the ufw by running the following command.
[email protected]:~$ sudo ufw enableAlways allow ports on the server before enabling the firewall; otherwise, you will not be able to access your server via SSH as ufw, which blocks port 22 by default.
Testing the Connection
Now, we have set up the FTP server in Passive mode and can check the ftp connection with the client application. Open FileZilla in your system to do so.
After entering the host, username, password, and port, now you can connect with your server. Now that you are connected to the FTP server running in Passive mode, you can upload files to the server.
Configuring SSL Certificates with the FTP Server
By default, the FTP server establishes the connection between the client and the server over an unsecured channel. This type of communication should not be used if you wish to share sensitive data between the client and the server. To communicate over a secure channel, it is necessary to use SSL certificates.
Generating SSL Certificates
We will use SSL certificates to set up secure communication between the client and the server. We will generate these certificates using openssl. The following command will generate SSL certificates for your server.
[email protected]:~$ sudo openssl req -x509 -nodes -day 365 -newkey rsa:2048 -keyout /etc/ssl/private/vsftpd.pem -out /etc/ssl/private/vsftpd.pemWhen you run the above command, you will be asked some questions. After you answer these questions, the certificates will be generated. You can check for the certificates in the terminal.
[email protected]:~$ sudo ls /etc/ssl/private/
Using Certificates in the Configuration File
Now, our certificates are ready to use. We will configure the 'vsftpd.conf' file to use the SSL certificates for communication. Open the configuration file with the following command.
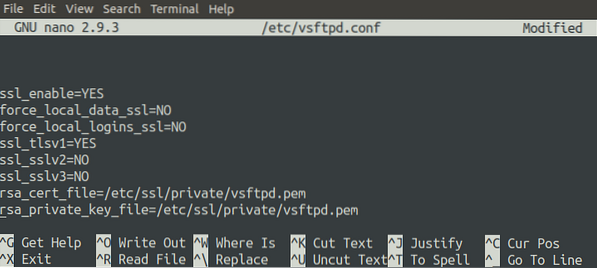
[email protected]:~$ sudo nano /etc/vsftpd.confAdd the following lines to the end of the files. These changes will ensure that the FTP server uses the newly generated SSL certificates to communicate securely with the client.
ssl_enable=YESforce_local_data_ssl=NO
force_local_logins_ssl=NO
ssl_tlsv1=YES
ssl_sslv2=NO
ssl_sslv3=NO
rsa_cert_file=/etc/ssl/private/vsftpd.pem
rsa_private_key_file=/etc/ssl/private/vsftpd.pem
Restart the FTP server to apply these changes.
[email protected]:~$ sudo systemctl restart vsftpdAfter restarting the server, try connecting with your server using the FileZilla client application. This time, the client application will ask you whether to trust these certificates.
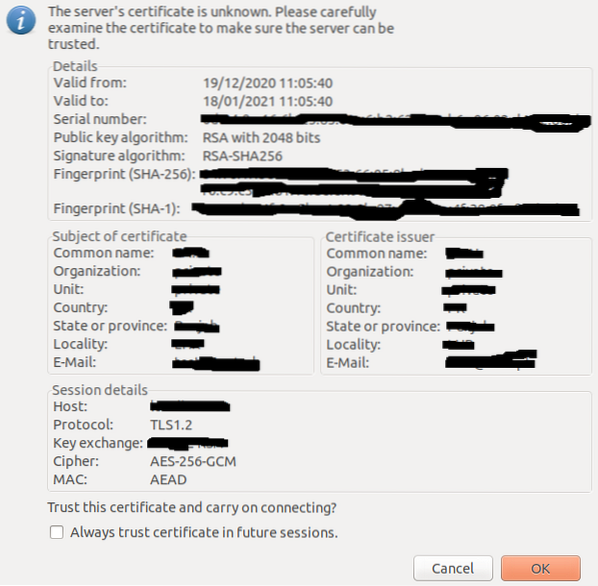
If you have certificates from a trusted certificates authority, then this warning should not appear. We generated our certificates using openssl, which is not a trusted certificates authority, which is why it asked for certificate authentication in our case. Now, we can communicate between the client and the server over a secure channel.
Anonymous Configuration
You can also enable anonymous login on your FTP server. With this configuration enabled, any user can log into the FTP server with any username and password. The following parameters in the configuration file will make the FTP server accessible anonymously.
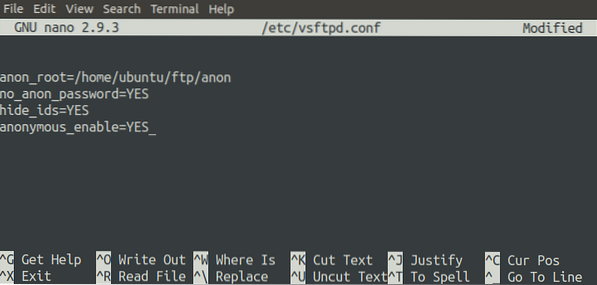
The above configuration sets the root path for anonymous users to be '/home/ubuntu/ftp/anon' and it will not prompt for the password when an anonymous user logs in.
NOTE: Ensure that the '/home/ubuntu/ftp/anon' path exists on the FTP server.
Now, restart the FTP server.
[email protected]:~$ sudo systemctl restart vsftpdAfter restarting the server, we will try to connect to the server via the Google Chrome Browser. Go to the following URL.
ftp://3.8.12.52The above URL will take you to the FTP server's root directory, as specified in the configuration file. With Anonymous login disabled, when you try to connect to the FTP server using a browser, you will first be asked for authentication, and then you will be taken to the root directory of the server.
Configure Local Access
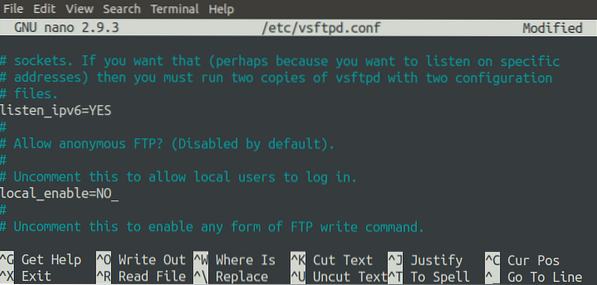
We can also allow or block local access to the FTP server by changing the configuration file. Currently, we can access our FTP server locally without using the FTP client application, but we can block this access. To do so, we must modify the 'local_enable' parameter.
First, restart the FTP server.
[email protected]:~$ sudo systemctl restart vsftpdAfter restarting the server, try to access the FTP server locally by using the command-line interface. Log into your remote server using SSH.
[email protected]:~$ ssh [email protected] -iNow, issue the following command to log into the FTP server locally using the command-line interface.
[email protected]:~$ ftp localhostWhen you run the above command, it will throw a 500 error.

Conclusion
File Transfer Protocol has been used for many years to transfer files and documents over the Internet. VSFTPD is one of the packages used as an FTP server on your machine. VSFTPD contains various configurations that you can use to customize your FTP server. This tutorial showed you how to configure an FTP server with TLS for enhanced security. To learn more about FTP configurations, visit the following link.
http://vsftpd.beasts.org/vsftpd_conf.html


