Starting from Ubuntu 18.04 LTS, Ubuntu uses Netplan to configure network interfaces by default.
In this article, I will show you how to use Netplan on Ubuntu 18.04 LTS.
Let's get started!
Netplan Configuration Files:
On Ubuntu 18.04 LTS, the Netplan YAML configuration files are placed in the /etc/netplan/ directory. To configure a network interface, you have to create or modify the required YAML files in this directory.
YAML configuration files has the .yaml extension. The default Netplan YAML configuration file /etc/netplan/50-cloud-init.yaml is used to configure network interfaces using Netplan.
Configuring Network Interface via DHCP with Netplan:
In this section, I will show you how to configure a network interface via DHCP on Ubuntu with Netplan.
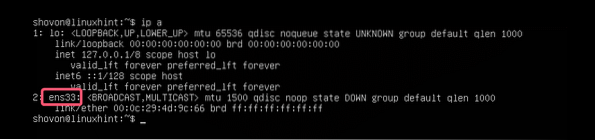
First, find the network interface name that you want to configure with the following command:
$ ip aAs you can see, I have one network interface card (NIC) installed on my Ubuntu 18.04 LTS machine named ens33. It does not have any IP address configured right now. So, let's use Netplan to configure it via DHCP.
To configure the network interface ens33 via DHCP using Netplan, open the default Netplan configuration file on Ubuntu 18.04 LTS /etc/netplan/50-cloud-init.yaml with the following command:
$ sudo nano /etc/netplan/50-cloud-init.yaml
You should see the following window.

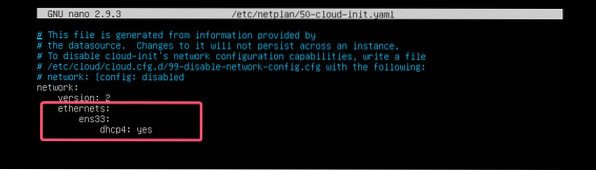
Now add the following lines in the network section.
ethernets:ens33:
dhcp4: yes
Here, dhcp4: yes means, use DHCP for IPv4 protocol to configure the network interface ens33.
NOTE: The indentations are really useful. Make sure you indent each line correctly. It will make the syntax clearer and more comfortable to the eye.
Finally, the configuration file should look something like this.
Now, press
The good thing about Netplan is that before you apply the changes, you can make sure the configuration file has no typos or any other mistakes with the following command:
$ sudo netplan tryNow press

If everything is alright, you should see the Configuration accepted message as marked in the screenshot below.
If there's any problem with the configuration file, you will see appropriate error messages here.

This feature will surely help you avoid complex hard to track future problems with Netplan configuration files.
Finally, apply the changes permanently using Netplan with the following command:
$ sudo netplan apply
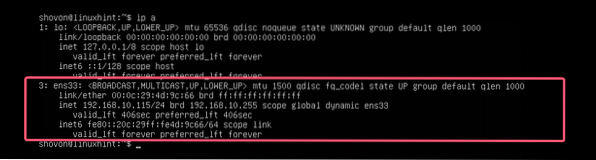
As you can see, the network interface ens33 is configured via DHCP.

Setting Up Static IP Address with Netplan:
If you want to set up a static IP on your network interface using Netplan, then this section is for you.
You can manually set the IP address, name server, gateway, etc. of your network interface using Netplan.
Let's say, you want to configure your network interface ens33 as follows:
Static IP address: 192.168.10.33Subnet mask: 255.255.255.0
Gateway: 192.168.10.1
DNS server: 192.168.10.1
First, check the network configuration of the ens33 network interface with the following command:
$ ip aThis is to help you verify that the network interface settings really changed.
Now, edit the Netplan YAML configuration file, /etc/netplan/50-cloud-init.yaml, with the following command:
$ sudo nano /etc/netplan/50-cloud-init.yamlIf you've followed me throughout the article, then the configuration file should be like this. Now, remove the line as marked in the screenshot below.

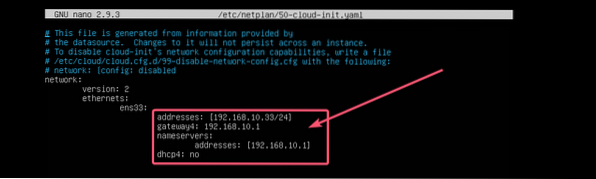
And type in the lines as marked in the screenshot below.
NOTE: Remember, indentation is essential for YAML files. If you forget to indent correctly, Netplan will not let you apply the configuration file. So, you must indent every step of the YAML configuration file, as shown in the screenshot below.
Now, press
Now, check whether there's any error in the configuration file with the following command:
$ sudo netplan try
Then, press

As you can see, the configuration file is accepted.

Finally, apply the configuration file with the following command:
$ sudo netplan apply
The IP address is changed as expected.

The gateway is also set correctly.

As well as the DNS server.

So, that's how you install and use Netplan on Ubuntu to configure network interfaces using YAML files. If you want to learn more about Netplan, please visit the official website of Netplan at https://netplan.io.
Thanks for reading this article.


