Whenever you perform any task, there can only be two possible outcomes, i.e., either the task will be performed successfully, or your system will render some errors. In either case, the output of the crontab job is always emailed to the user on his given account, from which the user can verify whether the job created earlier has been carried out. If not, then the user can easily figure out the reason behind it. In today's article, we will try to learn the basic method of using Cron in Linux.
Note: The method demonstrated in this article is performed in Linux Mint 20.
Using Cron in Linux
To use Cron in Linux Mint 20, perform the steps listed below:
First, you should have a crontab file open for entering your crontab jobs. If this file already exists, you can simply open the file in a text editor of your choice and start entering your desired crontab jobs. However, if this file is not already present, then you must create it first. To create the file, launch the terminal and run the following command:
$ crontab -e
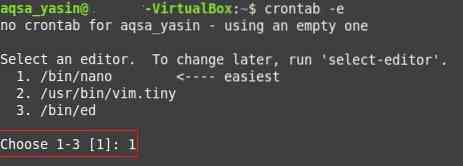
After running this command in the terminal, your system will explicitly state whether a crontab file already exists. In our case, it did not exist, as you can see in the image below. You will then be asked to choose an editor of your choice from the given list to open the newly-created file. Here, the nano editor is pointed out by default since it is the easiest one to use. We chose option 1 out of the three options given, and then we pressed the Enter key to confirm our choice.
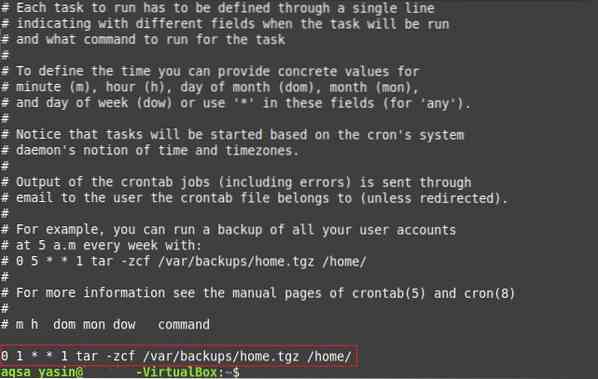
After choosing the desired text editor, your crontab file will open with the selected text editor and you will be able to edit the file. Since we chose the nano editor, our crontab file was opened with the nano editor. You can go through the comments that are present in this file, as they provide instructions for how to edit this file and add the crontab jobs to it.
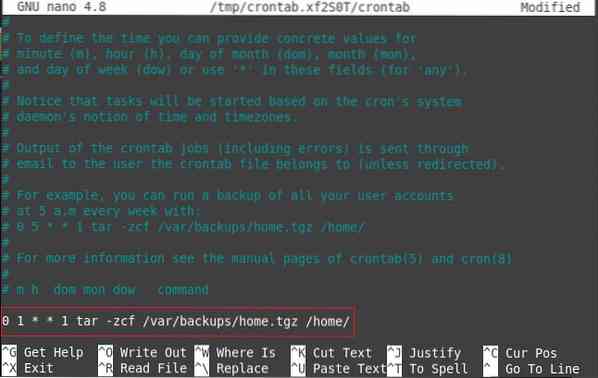
For the sake of explanation, we will share with you the creation of a crontab job for scheduling the backups of all the user accounts in your system. This backup will occur at 1 a.m. every week. To create such a crontab job, type the following line in your crontab file without the “#” symbol:
0 1 * * 1 tar -zcf /var/backups/home.tgz /home/Here, the five parameters before the task to be performed specify the minutes (0-59), hours (0-23), day of the month (1-31), month (1-12), and day of the week (0-7), respectively. You can specify any integer within the ranges provided for each of these parameters, or you can put in an asterisk instead of an integer value to indicate any value in the given range. The crontab job that we wished to create is shown in the image below. After making this entry, you can simply save the file and exit the editor by pressing Ctrl+X.
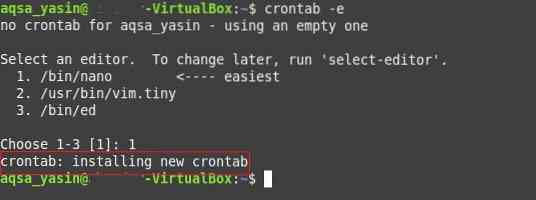
The best thing about the crontab file is that after making modifications to it, you do not have to tell your system to read the updated version of your file manually. Rather, the file automatically synchronizes with your system as soon as you make any changes to this file, which means that you can add as many crontab jobs to the file as you would like. After doing so, simply save the file and close it, and you will be informed via the terminal that your system is installing the new crontab file, as highlighted in the image below:
In this way, making use of the crontab jobs, you can schedule backups, upgrades, or any other task of your choice, such as running a bash script at a specified time. You can also have a look at all the crontab jobs that you have added to your crontab file via the terminal by running the following command:
$ crontab -l
Running the above command will list all the crontab jobs present in the crontab file. In this case, since we have only added one crontab job to our crontab file, only that crontab job will be listed in our terminal, as highlighted in the image below:
Conclusion
By creating a crontab file and mentioning the crontab jobs in it, you can conveniently schedule future tasks to occur automatically without requiring you to intervene. The crontab jobs are especially helpful if you are a forgetful person and often miss out on certain important tasks right at the time they are supposed to be carried out. You can easily create a crontab job for every important task, and resultantly, hand over the responsibility of carrying out that job to the Cron daemon at the specified time.


