Linux Operating system provides multiple tools to manage its system. One of the helpful tools in Linux is the “chage” command. From its name, the “chage” command is derived from the words “Change Age”, which is used to modify the information such as duration when to change password, make account status active or inactive, sets expiry date of the account, and sets a reminder to change the password through an alarm before user's account will be inactive.
It is important to enforce users to modify the password after a certain period due to security reasons. If you're an admin, then modified and updated information will be visible to you.
Syntax of Chage Command
The syntax of the “chage” command utility is:
Chage [options… ] User_Login_Name
Chage Commands Options
The “chage” command supports many useful options. Let's start with a few examples to learn its functions:
Display Current Expiry Information
To display the complete statistics of changing account information, use the “-l” option. Execute it with the login name on the terminal to get updates:
$ chage -l [user_name]In my system, user_name is “warda”. So, the command would be:
$ chage -l warda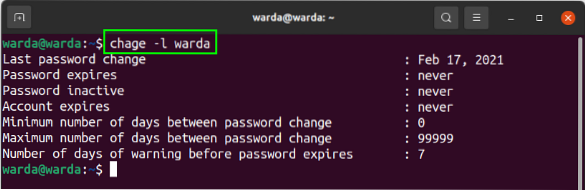
Change Current Expiry Date
To modify the current password expiry date status, use the “-d” option. Using this option will let you replace the current date and shows you the updated one.
$ chrt -d 2021-02-01 warda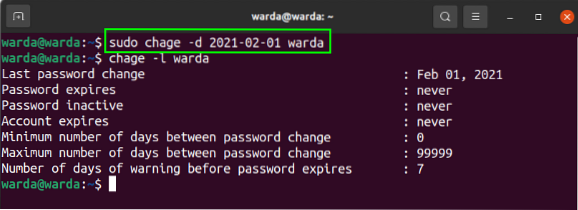
As you can see, the current status of the password expiry date has been updated.
Lock an Account
The “chage” command allows you to set a duration to lock the user's account where it will no longer remain accessible.
The “-E” option of the “chage” command utility is used to set the password expiry date of the account. When you update the expiry date, your password will be saved. And if you don't change your password before that expiry date, your account will be locked. This is a very helpful option in terms of security:
$ chage -E 2022-02-01 warda
(As you can see, the expiry date is updated. The account will be locked/expired on 1st Feb 2022.)
Maximum Number of Days to Change Password
Use the “-M” command to set the duration of a maximum number of days in which the password can be changed.
So, to set it, execute this option in the following way:
$ sudo chage -M 10 warda
Limit to Change Password After Expire
The “chage” command supports the option which allows you to change the password after its expiry date. Once you set the limit of days using the “-I” option, it would allow the user to change the account password during its inactivity period:
$ sudo chage -I 10 warda
Password Expiry Warning Text
To set the warning alarm before the account gets locked, use “-W”. It will set the duration in which the warning alarm will be displayed at every login. By default, the value is set to 7 days:
$ sudo chage -W 5 warda
Display Help
To get any kind of help about the “chage” command options, use “-h” in the terminal:
$ chage -h
Conclusion:
This tutorial discussed the main functions of the “chage” command. The “chage” command is used to modify the password expiry date of the user's account in which you can change the current status of the expiry date, set expiry date to lock the account, active and inactive status, and warning days before the account get expired.


