By default, Linux Kernel comes with the open-source Nouveau driver for systems using Nvidia Graphics cards. That being said, the open-source driver lacks 3D acceleration support which can be a big issue for 3D graphics related workloads. Also, if you plan on playing games on your Linux PC, the driver can be limiting you.
As such, you must install the appropriate Nvidia drivers to make sure your graphics card can perform to its fullest. With this in mind, we have put together a comprehensive tutorial on how to install Nvidia drivers on Ubuntu.
Also, we know that Ubuntu users have their preferences. Some of you are content with the graphical user interface (GUI), while others feel more comfortable and powerful using the command-line interface (CLI). As such, we will show you how to install the Nvidia driver on Ubuntu using both methods - via GUI as well as Command-Line.
So without further ado, let's get started:
Installing Nvidia Drivers on Ubuntu
Method 1: Using GUI
First things first, we need to check what graphics card your computer is using in the first place.
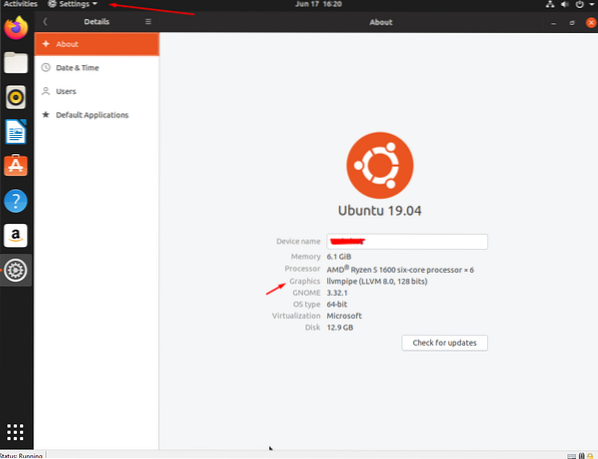
To do this, open “System Settings” and go to “Details.”
Note: “System Settings” is different from “Settings.” Both are accessible from the Application Menu.
By default, your Ubuntu installation will show you the integrated graphics that comes with your CPU. For example, if you have an Intel processor, it will show you the associated Intel HD graphics.
Now that you know what graphics are being used on your machine, you need to head over to the “Software & Updates” program from the application menu.
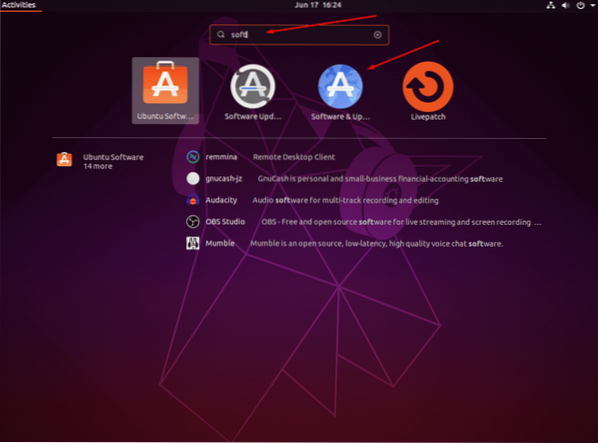
Open it and go to the “Additional Drivers” tab.
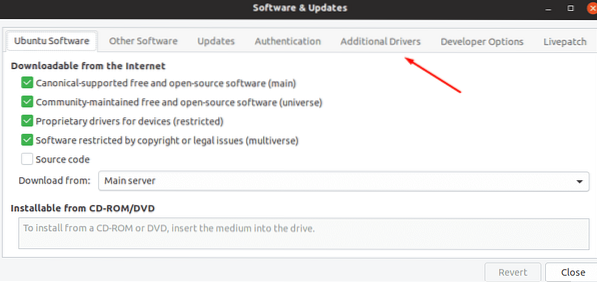
From here, you will see a list of proprietary drivers, including the default driver that is being used for your Nvidia graphics card - the Nouveau driver.
Depending on the Nvidia graphics card you have on your system, the screen should show you different driver options. Select the option based on your system specs and click the “Apply Changes” to install that particular driver.
Once the installation is complete, you will need to restart your system for the new graphics driver to take effect. After the system reboots, again head back to System Settings > Details. Here you will see the newly installed Nvidia driver listed under the Graphics section.
And that's it! You have successfully installed an Nvidia driver on Ubuntu.
Now, in case you wish to revert to the integrated Intel HD Graphics, open the new “Nvidia X Server Settings” program from the application menu. From here, click on the “PRIME Profiles” tab on the left-side panel and select the Intel graphics as your preferred choice.
Similarly, following the same steps again, you can go back to using the Nvidia graphics if and when necessary.
Method 2: Using Command-Line
First, you will need to open up the terminal.
You can either right-click on the desktop background and open the Terminal interface or go to the “Application Menu” and search for the “Terminal” program. With access to the terminal window, type in the following command:
sudo lshw -c display
or
sudo lshw -c video
Both these commands will show you basic details about your Ubuntu installation, including which graphics driver you are using. As mentioned earlier, by default, you will see your system using the “Nouveau” driver, which is mentioned under the “Configuration” section.
Next, you will need to type in the following command:
sudo ubuntu-drivers devices
This will fetch a list of the available drivers for the Nvidia card straight from the Ubuntu repository. Similar as before, depending on which graphics card you have installed, it will show you different driver options.
As you can see, some of the drivers are recommended by Ubuntu, which is evident from the “recommended” tag that comes with them. You should install the recommended drivers to ensure your system doesn't run into any sort of issue.
Now, to install the recommended driver, all you need to do is just type in this command:
sudo ubuntu-drivers autoinstall
However, if you are looking to install a particular driver, then you need to run this code:
sudo apt install nvidia-driver-version-number
For example,
sudo apt install nvidia-driver-430
Once the driver is installed, you need to restart the system to complete the process, which will enable “Nvidia-Prime” - the technology which allows you to switch between the Intel and Nvidia graphics.
Now, you can reboot your computer from the command line interface using the following command:
sudo shutdown -r now
Once your system reboots, again open the terminal window and type in “sudo lshw -c display” to check if the Nvidia driver is showing under the configuration section.
And voila, you have successfully installed the Nvidia driver on Ubuntu using the command-line.
Now, in case you wish to revert to Intel graphics card, you can just type in the following command in the terminal:
sudo prime-select intel
Similarly, using the given command, you can switch back to the Nvidia card.
sudo prime-select Nvidia
Note: Remember, you will need to reboot your system each time after making the changes for it to take effect.
Wrapping Up
That brings us to the end of the tutorial on how to install Nvidia driver on Ubuntu using both the command line as well as the GUI. We hope that you found the read useful and that it helped you in installing the proper driver for your Nvidia graphics card on your Linux PC.
 Phenquestions

