Actually you don't even need to know the Iptable's syntax to use it, you have graphical tools like Firewall Builder which can make the learning process unnecessary but if the desire is to increase Linux administration knowledge Iptables is the first step to learn how to practically administrate security under Linux and even ease managing CISCO or Fortigate security devices and similar.
Iptables basically allows you to instruct your system to accept, refuse or forward a connection depending on chosen parameters, for example to redirect all connections to X port to a different IP address, to block all connections coming from a specific IP, IP range or to accept all connections coming from whitelisted IP addresses among many other functions.
In this tutorial we'll learn how to protect a Web Server, how to forward connections to internal IP addresses from our LAN and how to offer specific services to whitelisted IP addresses only.
Installing Iptables
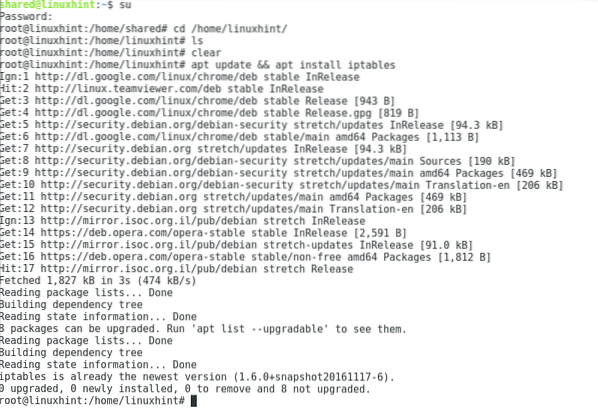
To install iptables on Debian/Ubuntu systems just run “ apt update && apt install iptables” as root or with “sudo” as prefix as in the following image.
Opening HTTP and HTTPS ports
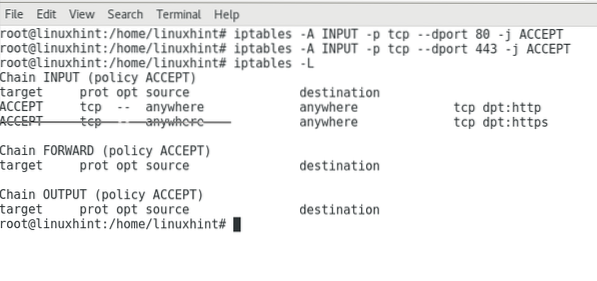
First of all lets add all ACCEPT policies starting by the web server.
iptables -A INPUT -p tcp --dport 80 -j ACCEPTiptables -A INPUT -p tcp --dport 443 -j ACCEPT
To see our rules added run “iptables -L”
Where:
Iptables = calls the program
-A = adds a rule
INPUT = incoming traffic
-p = protocol
-ddport = destination port
-j = specify the “target”, the target is the kind of policy: ACCEPT, DROP, QUEUE or RETURN.
Then on the sample of the image above we are telling Iptables to add a rule for incoming traffic through TCP protocol and ports 80 and 443 to be accepted.
We can change the command to accept the connection only from a specific IP by adding the parameter “-s”:
iptables -A INPUT -s 127.0.0.1 -p tcp --dport 80 -j ACCEPT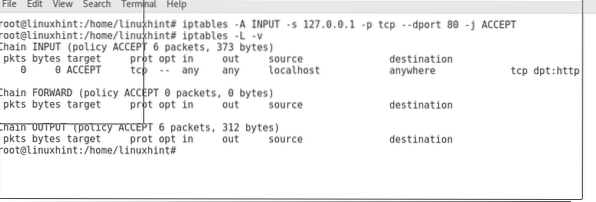
Where:
s = source
Iptables -L = lists all iptables loaded rules
Iptables -L -v = the same with verbosity.
We can also test our firewall with nmap:
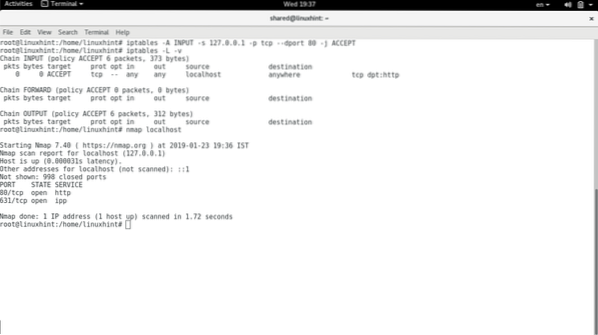
As we can see the port 80 is open both according to “iptables -L” and Nmap.
Note: For more information on Nmap usage you can read our tutorial on it
Protecting your server
#Open HTTP and HTTPS services.iptables -A INPUT -p tcp --dport 80 -j ACCEPT
iptables -A INPUT -p tcp --dport 443 -j ACCEPT
#Open SSH Port Service
iptables -A INPUT -p tcp --dport 22 -m conntrack --ctstate NEW,ESTABLISHED -j ACCEPT
Where the new parameters are:
-m = means “match” and is used to call Iptable's extensions like conntrack which is not part of iptable's core functions.
conntrack = Allows to track information on connections like specific addresses or in this case the state of the connection. This must be used carefully, since many rules to defend servers from some attacks use conntrack while it's use is limited by the hardware and such limitation can be used to overload the server's resources.
-ctstate = determines the state of the rule to match, the possible states are: NEW, ESTABLISHED, RELATED and INVALID.
#Protect your SSH Service against brute force attacks by allowing only a specific IPto access iptables -A INPUT -p tcp -s X.X.X.X --dport 22 -m conntrack --ctstate NEW,
ESTABLISHED -j ACCEPT
#Protect your SSH Service against brute force attacks by limiting connection attempts
Iptables -A INPUT -p tcp -m tcp --dport 22 -m conntrack --ctstate NEW -j 22-test
Iptables -A 22-test -m recent --name CONNECTIONS --set --mask 255.255.255.255 --rsource
Iptables -A 22-test -m recent --name CONNECTIONS --rcheck --mask 255.255.255.255
--rsource --seconds 30 --hitcount 3 -j 22-protection
Iptables -A 22-test -j ACCEPT
Iptables -A 22-protection -j DROP
Where:
In the first liNe our rule says “-m conntrack -ctstate NEW” which means if the connection is new then pass to the rule “22-test”.
The second line says packets netmask 255.255.255.255 are named as CONNECTIONS .
The third line says if a CONNECTIONS is seems over 3 times within 30 seconds the firewall continues applying the chain 22-protection. The fourth line says if the CONNECTIONS wasn't seem over 3 times within 30 seconds it can be accepted.
Fifth line, which belongs to the 22-protection chain says to drop CONNECTIONS if seem over 3 times within 30 seconds.
Now to end, lets refuse all non-accepted connections and let's allow all outgoing traffic:
iptables -P OUTPUT ACCEPTiptables -P INPUT DROP
Where -P means the target's chain, remember the target is the policy, ACCEPT, DROP, QUEUE or RETURN. In this case we are saying the default policy for outgoing traffic is to accept and the default policy for incoming traffic is to refuse, unless we specified something different in previous rules. This is a very basic firewall which does not includes rules for many attacks, for learning purposes and not for production, at the end of the article I attach a firewall I used for production on a server, it has comments explaining each rule.
FORWARDING A CONNECTION TO A SPECIFIC PORT TO A SPECIFIC IP ADDRESS
This is very useful also for desktop users who want to enroute a connection through a specific device, it can be useful even for gamers, usually we do it from the router's settings but let's assume the routing device is running Iptables.
iptables -A PREROUTING -t nat -p tcp -d X.X.X.X --dport 8080 -j DNAT --to-destinationY.Y.Y.Y:80
iptables -A POSTROUTING -t nat -p tcp -j SNAT --to-source X.X.X.X
The rules above invoke to NAT (Network Address Translation) to specify connections through protocol TCP, to the address X.X.X.X and port 8080 will be redirected to address Y.Y.Y.Y, port 80. The second rule specifies replies must be sent to the source address (X.X.X.X). We can use these rules to allow access to an IP camera, to enable online gaming with external networks, etc.
This tutorial was meant to introduce beginners to Iptables and only explains a limited number of basic functions. Below you can see a sample of a well planned firewall which was used for a production server, it includes from some of the rules we already saw to more complex rules to prevent DDoS attacks among others.
The next tutorial will be on sniffing within local networks, but on a next tutorial i'll explain some of the rules applied to the firewall below. Thank you for following LinuxHint.com, keep following us for future updates on Iptables and Linux in general.
Bonus: Sample of production firewall
iptables -F#---- Enable bad error message protection
enable /proc/sys/net/ipv4/icmp_ignore_bogus_error_responses
#---- Turn on reverse path filtering. Safer, but breaks asymetric routing and/or IPSEC
enable /proc/sys/net/ipv4/conf/*/rp_filter
#---- Don't accept source routed packets. Source routing is rarely used for legitimate
purposes disable /proc/sys/net/ipv4/conf/*/accept_source_route
#---- Disable ICMP redirect acceptance which can be used to alter your routing tables
disable /proc/sys/net/ipv4/conf/*/accept_redirects
#---- As we don't accept redirects, don't send Redirect messages either
disable /proc/sys/net/ipv4/conf/*/send_redirects
#---- Ignore packets with impossible addresses
disable /proc/sys/net/ipv4/conf/*/log_martians
#---- Protect against wrapping sequence numbers and aid round trip time measurement
enable /proc/sys/net/ipv4/tcp_timestamps
#---- Help against syn-flood DoS or DDoS attacks using particular choices of initial
TCP sequence numbers enable /proc/sys/net/ipv4/tcp_syncookies
#---- Use Selective ACK which can be used to signify that specific packets are missing
disable /proc/sys/net/ipv4/tcp_sack
modprobe nf_conntrack_ipv4
modprobe nf_nat
# modprobe nf_conntrack_ipv6
# modprobe nf_conntrack_amanda
# modprobe nf_nat_amanda
modprobe nf_conntrack_h323
modprobe nf_nat_h323
modprobe nf_conntrack_ftp
modprobe nf_nat_ftp
# modprobe nf_conntrack_netbios_ns
# modprobe nf_conntrack_irc
# modprobe nf_nat_irc
# modprobe nf_conntrack_proto_dccp
# modprobe nf_nat_proto_dccp
modprobe nf_conntrack_netlink
# modprobe nf_conntrack_pptp
# modprobe nf_nat_pptp
# modprobe nf_conntrack_proto_udplite
# modprobe nf_nat_proto_udplite
# modprobe nf_conntrack_proto_gre
# modprobe nf_nat_proto_gre
# modprobe nf_conntrack_proto_sctp
# modprobe nf_nat_proto_sctp
# modprobe nf_conntrack_sane
modprobe nf_conntrack_sip
modprobe nf_nat_sip
# modprobe nf_conntrack_tftp
# modprobe nf_nat_tftp
# modprobe nf_nat_snmp_basic
#Now we can start adding selected services to our firewall filter. The first such thing
is a localhost interface iptables -A INPUT -i lo -j ACCEPT
#We told the firewall to take all incoming packets with tcp flags NONE and just DROP them.
iptables -A INPUT -p tcp ! -m conntrack --ctstate NEW -j DROP
#We tell iptables to add (-A) a rule to the incoming (INPUT)- SSH works on port 50683
instead 22.
iptables -A INPUT -p tcp -m tcp --dport 50683 -j ACCEPT
iptables -A INPUT -p tcp -m tcp -s specific ip --dport 50683 -j ACCEPT
iptables -A INPUT -p tcp -m tcp -s specific ip --dport 50683 -j ACCEPT
iptables -A INPUT -p tcp -m tcp -s specific ip --dport 50683 -j ACCEPT
iptables -A INPUT -p tcp --dport 50683 -m conntrack --ctstate NEW -m recent --set
--name SSH -j ACCEPT
iptables -A INPUT -p tcp --dport 50683 -m recent --update --seconds 60 --hitcount 4
--rttl --name SSH -j LOG --log-prefix "SSH_brute_force "
iptables -A INPUT -p tcp --dport 50683 -m recent --update --seconds 60 --hitcount 4
--rttl --name SSH -j DROP
iptables -A INPUT -p tcp --dport 50683 -m conntrack --ctstate NEW -m recent --set
--name SSH
iptables -A INPUT -p tcp --dport 50683 -m conntrack --ctstate NEW -j SSH_WHITELIST
iptables -A INPUT -p tcp --dport 50683 -m conntrack --ctstate NEW -m recent --update
--seconds 60 --hitcount 4 --rttl --name SSH -j ULOG --ulog-prefix SSH_bru
iptables -A INPUT -p tcp --dport 50683 -m conntrack --ctstate NEW -m recent --update
--seconds 60 --hitcount 4 --rttl --name SSH -j DROP
#Now I allow imap,and smtp.
-A INPUT -p tcp --dport 25 -j ACCEPT
# Allows pop and pops connections
-A INPUT -p tcp --dport 110 -j ACCEPT
-A INPUT -p tcp --dport 995 -j ACCEPT
############ IMAP & IMAPS ############
-A INPUT -p tcp --dport 143 -j ACCEPT
-A INPUT -p tcp --dport 993 -j ACCEPT
########### MYSQL ###################
iptables -A INPUT -i eth0 -p tcp -m tcp --dport 3306 -j ACCEPT
########## R1soft CDP System ###############
iptables -A INPUT -p tcp -m tcp -s specific ip --dport 1167 -j ACCEPT
############### outgoing ###################
iptables -I INPUT -m conntrack --ctstate ESTABLISHED,RELATED -j ACCEPT
### Allow ongoing, block incoming not defined ###
iptables -P OUTPUT ACCEPT
iptables -P INPUT DROP
iptables -L -n
iptables-save | tee /etc/iptables.test.rules
iptables-restore < /etc/iptables.test.rules
#service iptables restart


