Features:
Some important features of Laravel horizon are mentioned below:
- It is an open-source package
- It shows all queues and job information using a beautiful dashboard.
- It provides information about pending jobs, completed jobs, and failed jobs.
- It provides queues and job information using metrics.
- It monitors the jobs by using tags.
Horizon Commands:
Some horizon commands are mentioned below to control the running horizon.
The following command is used to pause the horizon process.
$ php artisan horizon:pauseThe following command is used to resume the paused horizon process.
$ php artisan horizon:continueThe following command is used to check the current status of the horizon process.
$ php artisan horizon:statusThe following command is used to terminate the horizon process. The horizon will terminate after completing all running jobs.
$ php artisan horizon:terminateInstall Horizon:
Prerequisites:
You have to install a new project using the latest version of Laravel before starting the steps of installing the horizon. The steps are shown here by using Laravel 8.x.
Installation Process:
Run the following command from the terminal to install the horizon package using the composer.
$ composer require laravel/horizonAfter installing Horizon, publish its assets using the horizon:install artisan command:
$ php artisan horizon:installpredis package is used in this tutorial to use predis as Redis client . Run the following command to install predis package using composer.
$ composer require predis/predisopen database.php file which is located under the config folder and set the value of the client as shown below.
'client' => env('REDIS_CLIENT', 'predis'),Run the following command to clear the cache before starting the horizon.
$ php artisan cache:clearRun the following command to start the horizon.
$ php artisan horizonThe following output will appear if the horizon is installed and works properly.

Code-based configuration:
It provides the opportunity to collaborate easily with project team members when working with queues. Different types of settings can be set by using queue:work artisan command. config/horizon.php configuration file is used to set different configurations. Open horizon.php file to check the default settings. The Queue Worker Configuration section of this file contains the following setting.
'defaults' => ['supervisor-1' => [
'connection' => 'redis',
'queue' => ['default'],
'balance' => 'auto',
'maxProcesses' => 1,
'tries' => 1,
'nice' => 0,
],
],
'environments' => [
'production' => [
'supervisor-1' => [
'maxProcesses' => 10,
'balanceMaxShift' => 1,
'balanceCooldown' => 3,
],
],
'local' => [
'supervisor-1' => [
'maxProcesses' => 3,
],
],
],
Here, the value of the balance can be simple or auto or null. When simple is set for balance then the process will split between two queues. When the auto is set for balance then it balances the queue workers based on remaining jobs and average wait time. If any queue becomes busy then the horizon will search for the available workers and transfers them to the queue to complete the task quickly. If the balance option is set to null then the supervisor will use a single pool of workers to process the running jobs. One supervisor is defined here by default. But it is possible to assign multiple supervisors and the particular connection, queues, balancing mechanism, etc. can be defined for each supervisor.
If you want to check the default setting of the Redis connection driver then open the config/queue.php file. The Redis section of this file contains the following setting.
'redis' => ['driver' => 'redis',
'connection' => 'default',
'queue' => env('REDIS_QUEUE', 'default'),
'retry_after' => 90,
'block_for' => null,
],
According to the setting, if no job is assigned then the queue status will remain default. Here, the value of retry_after indicates that the queue will restart after 90 seconds. You can increase or decrease the values based on the requirement.
Open Horizon Dashboard:
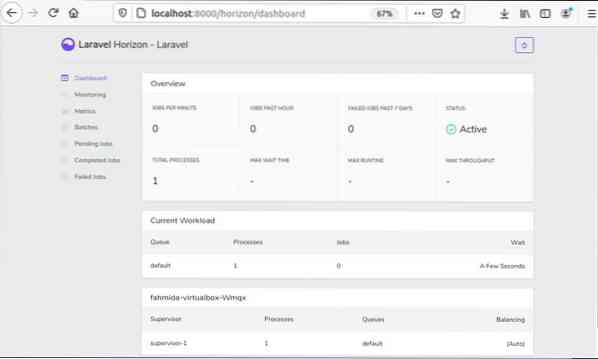
Run the following URL from the browser to see the different queue related information from the horizon dashboard.
http://localhost:8000/horizon/
The following output will appear if the horizon is working properly. The output shows that the horizon is active now, one supervisor and default queue are defined and no job is assigned yet.
Modify the default section of the horizon.php file with the following code.
'defaults' => ['supervisor-1' => [
'connection' => 'redis',
'queue' => ['default','email'],
'timeout' => 30,
'sleep' => 3,
'balance' => 'auto',
'minProcesses' => 1,
'maxProcesses' => 10,
'tries' => 1,
'nice' => 0,
],
],
Here, another queue, email is added, timeout is set to 30 seconds, sleep is set to 3 seconds, minProcesses is set to 1, and maxProcesses is set to 10. To activate these settings you have to stop the running horizon, clear the configuration cache, and start the horizon again. Press ctrl+c to terminate the running horizon. Run the following commands to clear the configuration cache and start the horizon again.
$ php artisan config:cache$ php artisan horizon
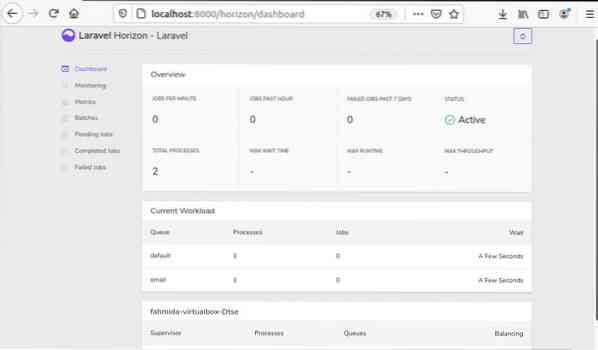
Run the following URL from the browser again to check the output based on the new setting.
http://localhost:8000/horizon/
The following output will appear in the browser-based on the current setting.
Conclusion:
The installation process and the way of running the horizon are mainly highlighted in this tutorial. You have to create a job and assign it to a queue to know the detailed uses of the horizon that is not covered in this article. This article will help the Laravel users to install the horizon and start working with it.


