LVM or Logical Volume Manager makes management of disk space on a Linux machine easier to manage. Features of LVM include:
- Create, resize, move and delete partitions on the disks
- Manage the space of multiple hard disks by creating logical volumes
- Operate on the system without knowing the total space of any partition
- Space of any partition can be resized or assigned to any low space partition at any time
- Change the file system of any existing partition or remove any partition from the system quickly
- Create snapshots of any running system
- Creates striped logical volumes of the disks
- Creation of software RAID partitions or standard partitions of a single disk
- Volumes of the disk can be extended on the fly to provide more flexibility to the system based on requirements.
Three main components of LVM are physical volumes, logical volumes and volume groups. The block devices that are used to store logical volumes are called physical volumes. Each logical volume holds a file system which corresponds to a partition and a unique name is assigned for each logical volume. The collection of all physical and logical volumes is called volume group.
In this tutorial, you will learn different utilities of LVM, such as how to create or remove a new volume, how to find out the information about current volumes, how to resize existing volumes of the disk on Ubuntu and creating snapshot of a running system.
Creating, Resizing and Removing LVM Components
You must have root privilege to run any LVM command. So, first of all, you have to run LVM with root password.
$ sudo lvm
Run the command to find all existing block devices. In the output, it is shown that there are two partitions which are /dev/sda1 and /dev/sda5, 1 disk in /dev/sdb and no physical volumes.
lvm> lvmdiskscan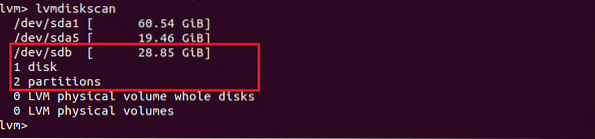
Create Physical Volume
pvcreate command is used to create physical volume from storage devices. Here, /dev/sdb is used for creating a physical volume. Run the commands to create a physical volume of 5GB. The success message will appear if the physical volume creates successfully.

Now, if you again run the command lvmdiskscan then you will see a physical volume is created. In the output, there is no free disk because the whole disk is created as a physical volume.

You can also use pvdisplay command to find the existing physical volumes.
Lvm> pvdisplay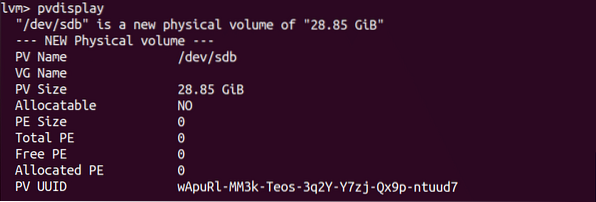
Create Volume Group
You can create a volume group after creating a physical volume. vgcreate command is used to create new volume group. You can create a volume group by using one or more physical volumes. There is only one physical volume. So, the volume group can be created by this one. Suppose, you want to create a volume group named vg1 with /dev/sdb, then run the command as below. The success message will appear if the volume group creates properly.
lvm> vgcreate vg1 /dev/sdb
vgdisplay command is used to get the information of existing volume groups. Run the command to show the output.
lvm> vgdisplay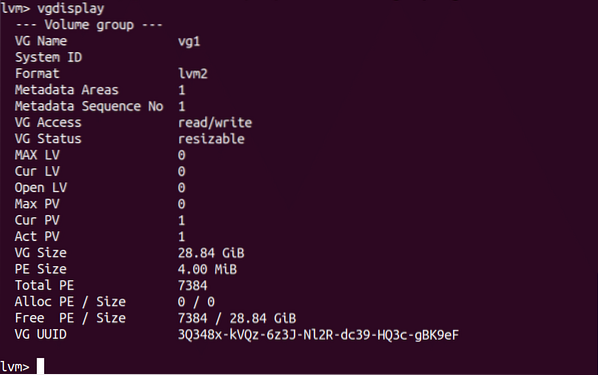
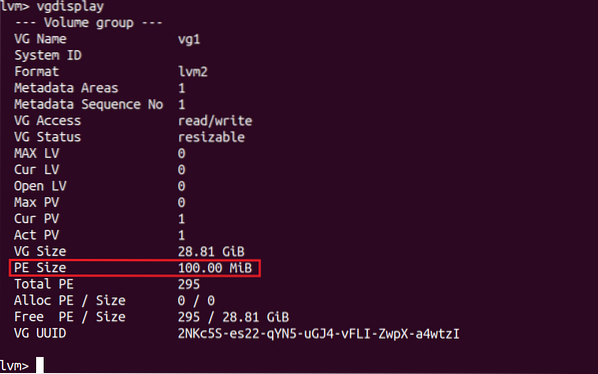
You can create multiple volume groups and the volume groups can have different extent size. To create volume group of specific extent size, the existing volume is removed here. vgremove command is used with volume group name for removing the existing volume group.
lvm> vgremove vg1
Run the following vgcreate command to create a volume group of size, 100M.
lvm> vgcreate -s 100M vg1 /dev/sdb
Now, vgdisplay will show the following output.
Create Logical Volume
You can create logical volume of specific size or all remaining free space. lvcreate command is used to create logical volume. The logical volume name is specified by -n option and the size of the volume is specified by -L option. Run the following command to create a logical volume of 10GB named lv1 for the volume group vg1 which is attached with a physical volume, /dev/sdb.
lvm> lvcreate -L 10G -n lv1 vg1
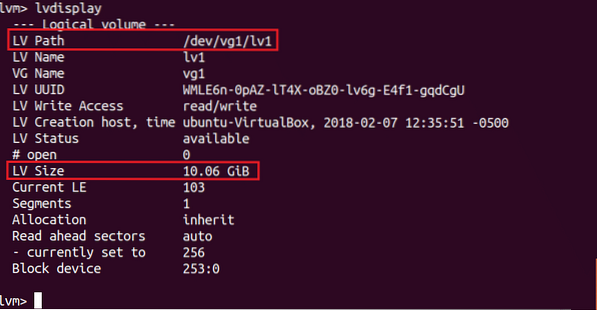
lvdisplay command is used to get the information of all existing logical volumes.
After creating logical volume if any free space exists in physical volume then a new logical volume can be created by using remaining free space with -l option. Run the command to create a logical volume, lv2 using all free space of volume group, vg1
lvm> lvcreate -l 100%FREE -n lv2 vg1
You can create a logical volume with many advanced options. Some of the options are explained here. One of the important options is -type which determines the allocation type of a logical volume. Some of the most commonly used types are linear, striped and raid1. The default type is linear where physical devices are added one after another. At least two physical volumes are required to create a striped type logical volume. The performance of this type of logical volume is better but it increases data vulnerability. To create striped logical volume -i option is used. raid1 type is used to create mirror of RAID1 volume. This type also requires minimum two physical volumes with necessary space to create logical volume. So, to create striped and raid1 type volume you have to create at least two physical volumes and run the following commands.
Stripped Volume:
lvm> lvcreate --type striped -i 2 -L 10G -n s_vol1 vol_groupRaid1 volume:
lvm> lvcreate --type raid1 -m 2 -L 20G -n m_vol1 vol_grouplvremove command is used to remove any existing logical volume. The following command will remove the lv2 logical volume which is located under vg1 volume group.
lvm> lvremove /dev/vg1/lv2
Create Snapshot
You have to use the original logical volume instead of physical volume to create a snapshot of that volume. Remove all existing logical volumes and create a new logical volume which is smaller than the size of physical volume because snapshot will be created on the free space of the physical volume.

Now, if you want to create a snapshot of logical volume then run the following command to create snapshot of lv1. Here, snapshot name is snap_ck and the size of snapshot is 6G. If the free space of physical device is less than 6G then an error will generate and no snapshot will create.
lvm> lvcreate -s -L 6G -n snap_ck vg1/lv1
-merge option is used to recover a logical volume from a snapshot. When the command executes then logical volume will be restored from where the snapshot is taken.
lvm> lvconvert --merge vg1/snap_ck
Resize Logical Volume
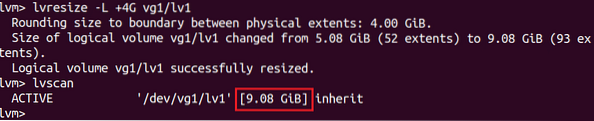
You can change the size of any logical volume easily by using lvresize command. This command is used with -L options for setting new size for any existing volume. At first, check the current size of any logical volume that you want to resize using lvscan command. The current size of the volume is 5GB in the following output.
lvm> lvscan
If you want to resize the volume and set the volume size to 9GB then run lvresize command with required options and check the volume size is increased properly or not.
lvm> lvresize -L +4G vg1/lv1lvm> lvscan
Remove Physical Volume from Volume Group
If any volume group contains two or more physical volumes and you want to remove the attachment of any particular physical volume from volume group then run vgreduce command with volume group name and physical volume name. If physical volume is in use then you will not be able to remove the volume from volume group. In that case, you have to move the required physical volume to another physical volume location of volume group. So volume group must have more than one physical volume to do the task. After moving physical volume, you can execute the following commands to remove that physical volume from volume group. You will not be able to run the commands if you have only one physical device in the volume group.
lvm> pvmove /dev/sdblvm> vgreduce vg1 /dev/sdb
lvm> pvremove /dev/sdb
It is necessary to have the knowledge of using LVM for managing the storage devices of the system efficiently. If you understand and test the mentioned commands of this tutorial properly then you will be able to apply these commands on Ubuntu for configuring your disks based on your requirements.


