With so many different parts that constitute a typical storage stack, it is a miracle that anything works at all. However, things do work well most of the time. The few times when things go wrong, we need utilities like xfs_repair to get us out of the mess.
Things can go wrong when you are writing a file and power goes out or there's a kernel panic. Even data sitting dormant on a disk may decay over time because of the physical structure of memory elements may change, this is known as bit rot. In all the cases, we need a mechanism for:
- Checking the data that is being read is the same data that was last written. This is implemented by having a checksum for each block of data and comparing the checksum for that block when data is being read. If the checksum matches, the data has not been altered
- A way to reconstruct the corrupt or lost data, either from a mirror block or from a parity block.
Sandbox setup
Let's setup a testbench to run an xfs repair routine instead of using actual disks with valuable data on it. If you already have a broken filesystem, you can skip this section and jump right head to the next one. This testbench is made up of a Ubuntu VM to which a virtual disk is connected providing raw storage. You can use VirtualBox to create the VM and then create an additional disk to attach to the VM.
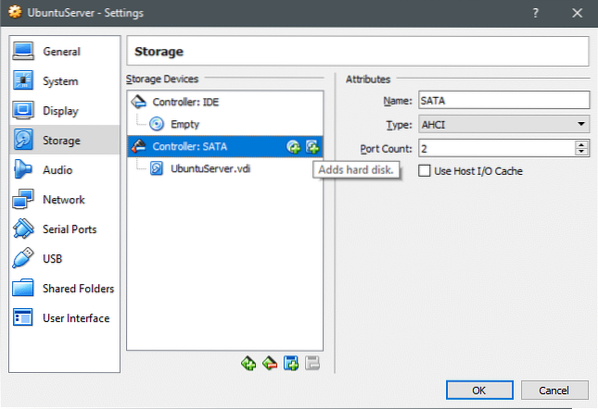
Just go to your VM's settings and under Settings → Storage section you can add a new disk to the SATA controller you can create a new disk. As shown below, but make sure your VM is turned off when you do this.
Once the new disk is created, turn on the VM and open up the terminal. The command lsblk lists all the available block devices.
$ lsblksda 8:0 0 60G 0 disk
├─sda1 8:1 0 1M 0 part
└─sda2 8:2 0 60G 0 part /
sdb 8:16 0 100G 0 disk
sr0 11:0 1 1024M 0 rom
Apart from the main block device sda, where the OS is installed, there's now a new sdb device. Let's quickly create a partition from it and format it with XFS filesystem.
Open up parted utility as the root user:
$ parted -a optimal /dev/sdbLet's create a partition table first using mklabel, this is followed by creating a single partition out of the entire disk (which is 107GB in size). You can verify that the partition is made by listing it using print command:
(parted) mklabel gpt(parted) mkpart primary 0 107
(parted) print
(parted) quit
Okay, now we can see using lsblk that there's a new block device under the sdb device, called sdb1.
Let's format this storage as xfs and mount it in /mnt directory. Again, do the following actions as root:
$ mkfs.xfs /dev/sdb1$ mount /dev/sdb1 /mnt
$ df -h
The last command will print all the mounted filesystems and you can check that /dev/sdb1 is mounted at /mnt.
Next we write a bunch of files as dummy data to defragment here:
$ dd if=/dev/urandom of=/mnt/myfile.txt count=1024 bs=1024The above command would write a file myfile.txt of 1MB size. If you want, you can automatically generate more such files, spread them across various directories inside the xfs filesystem (mounted at /mnt) and then check for fragmentation. Use bash or python or any other of your favorite scripting language for this.
Checking and Repairing Errors
Data corruptions can silently creep into your disks without your knowledge. If a data block is not read and the checksum not compared then the error may just pop up at the wrong time. When someone is trying to access the data, in real time. Instead, it is a good idea to run a thorough scan of all the data blocks for the check of bit rot or other errors frequently.
The utility xfs_scrub is supposed to do this task for your. Inspired partly by OpenZFS' scrub command, this experimental feature is available only on xfsprogs version 4.15.1-1ubuntu1 which is not a stable release. If it wrongly detects error, it might mislead you into causing data corruption instead of fixing it! However, if you want to experiment with it, you can use it on a mounted filesystem using the command:
$ xfs_scrub /dev/sdb1Before trying to repair a corrupt filesystem, first you would have to unmount it. This is to stop applications from inadvertently writing to the filesystem when it is supposed to be left alone.
$ umount /dev/sdb1Repairing errors is as simple as running:
$ xfs_repair /dev/sdb1Essential metadata is always kept as multiple copies, even if you are not using RAID and if something has gone wrong with the superblock or inodes then this command can fix that issue for you in all likelihood.
Next steps
If you are seeing data corruption often (or even once, if you are running something mission critical) consider replacing your disks as this might be an early indicator of a disk which is about to die.
If a controller fails, or a RAID card has given up on life, then no software in the world can repair the filesystem for you. You don't want expensive data recovery bills and neither do you want long downtimes, so keep an eye on those SSDs and spinning platters!


