
Alpine Linux is gathering a lot of attention because of its super-small size and focus on security. However, Alpine is different from some of the other lightweight distros we covered on FOSSLinux. It isn't your typical desktop distribution as it is terminal-based like Arch and is marketed as a “general purpose distro.”
It is currently widely adopted as a Docker container thanks to its ultra-small footprint. However, it can be used for all sorts of Linux deployments that benefit from small, resource-efficient Linux distros.
Now, that statement might feel too generic. But don't worry, as we have put together an in-depth and comprehensive review of Alpine Linux, giving you a detailed look at what it has under the hood and how to use it. As such, by the end, you should have a clear understanding of whether you should consider Alpine Linux as your next Linux distro.
So without further ado, let's dive in.
Alpine Linux Introduction
Alpine Linux was initially built on Gentoo as a fork of the LEAF project. Currently, it is a community-driven project developed with a focus on security and bundled with features like SSP and PaX.
As such, the Linux distribution sees plentiful use in servers, routers, firewalls, VoIP Boxes, and VPNs. However, it has started to receive a lot more traction after Docker decided to use Alpine as its base image, replacing Ubuntu.
So what makes Apline Linux so amazing? What goes on under the hood that grants such a tiny distro the power to compete with the big boys?
Well, here is a look at its pros and cons to give you a basic idea of what it's good for and what it struggles with.
Pros of Alpine Linux:
-
Small:
Straight from the development phase Alpine Linux has been designed with server applications in mind, so it doesn't bundle in any bloat or crap to weigh down the distro.
However, the main reason behind its lightweight is because it replaces many of the core components found on popular distros in favor of some lightweight alternatives.
For example, instead of the bash shell, it uses busybox, which is just 800kb. Also, replacing the traditional glibc library we see on most distros, Alpine comes with musl, which will just take up 6kb.
-
Secure:
Alpine Linux comes bundled in with Grsec/Pax kernel patches. This adds some powerful security features like enhanced auditing, addressing space protection, process control, and role-based access on top of the Linux kernel.
With mainstream distros, this patch is not bundled in by default. As such, users will have to install them manually, and it is a big hassle.
-
Both Stable and Rolling Release Models
You can get Alpine Linux under two release models.
First, you have the stable release, which, as it sounds, is a properly tested version of Alpine where most of the bugs have been ironed out. A new stable version is released every 6 months and supported for 2 years.
Second, you have the edge release, which is like a rolling release. It isn't as stable as the stable release, but you will rarely run into bugs. And if you want to try out all the latest Alpine Linux features first, this is the release you should go with.
-
Unique Package Manager:
With Alpine Linux, you get access to APK - Alpine's unique package manager. With APK, you get a simple, straightforward, and fast means for installing, upgrading, and removing packages. APK can also load the package history from a previous state which can help revert to a working version if an upgraded package is buggy.
Other than this, APK also makes it super easy to create new packages called APKBUILD. It follows a similar package script implementation like what we see with the PKGBUILD for Arch.
-
Helpful Community:
Alpine Linux is yet to amass a big enough following to rival the giants. However, most likely because of its small community, it feels very personal and connected.
If you have any issues, find any bugs, recommend features, or want to chat, you can just hit up the developers. The folks over there are super helpful and routinely respond to user queries.
Cons of Alpine Linux:
-
Basic Installer:
Alpine Linux comes with the Syslinux bootloader. It's a simple and lightweight bootloader that goes with the goal and vibe of Alpine. However, it's fairly limited in terms of functionality.
For example, Syslinux can only access the files that are located in its own partition. It cannot be used for multi-filesystem booting, which can be an issue for some users.
-
No GUI:
Alpine Linux is a minimal distro, and so it ditches a desktop environment. Yes, you can install a GUI of your liking manually, but the fact that it's completely terminal-based by default can be an issue for some users, especially for beginners.
So, What Makes Alpine Linux Perfect for Docker?
As we already discussed, Alpine Linux is currently the recommended base OS layer for Docker, and this is just perfect.
When using a container like Docker, you must have access to all the available resources without anything wasted because of bloat or poor optimization. However, you don't want to settle with barebone features that compromise security.
Alpine Linux offers the ideal solution for this problem with its small footprint and focuses on security.
Furthermore, if you require additional bells and whistles, you can easily add them if and when necessary. This keeps the system bloat-free and thereby maximizes the available resources for your application.
Alpine Linux: A Guide Through The Setup Process
Now that you have a basic understanding of Alpine Linux, its features, and its use cases, let's walk you through how to set it up on your system. For this tutorial, we will be installing Alpine Linux on a virtual box. However, the installation process should be similar if you wish to install it on Docker or straight on your harddisk.
Step 1: Download the Alpine Linux ISO
First things first, you need to download the installation ISO.
Now, when you head over to the official Alpine Linux download page, you'll find tons of downloadable images.
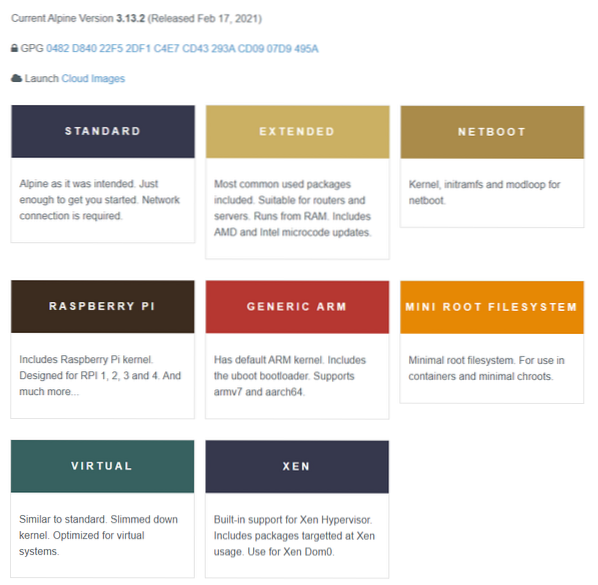
Here's a quick look at how each of them is different from one another:
- Standard: This is a minimal installation image and will require networking from your end.
- Extended: Builds on top of the Standard ISO by bundling in additional packages. This can be more convenient, especially if you are going for a disk-free installation.
- Netboot: This is meant to be used with PXE.
- Raspberry Pi: Packs in the Raspberry Pi kernel and optimized for RPI 1, 2, 3, 4, and much more.
- Generic ARM: Comes with default ARM kernels and the uboot bootloader. Ideal for armv7 and aarch64.
- Mini Root Filesystem: Designed for use in containers like Docker and minimal chroots.
- Virtual: This is similar to the standard image but uses a different kernel for better virtual environment performance.
- Xen: As the name implies, this is a specialized image intended to be used with Xen dom0 installations.
Now, here we're going to be using the Standard image for demonstration purposes. However, you should pick the image that's most suited to your usage and requirements.
Step 2: Installing Alpine Linux
Note: Anytime during the installation process, if you have any problem, you can type in “?” and hit enter to get detailed instructions.
After booting up the Alpine Linux ISO image, you will find yourself on the following screen asking to log in as localhost. You will need to log in as “Root” as it is the only user available at this moment. Just type in Root and hit Enter, and you can get started with the installation process.
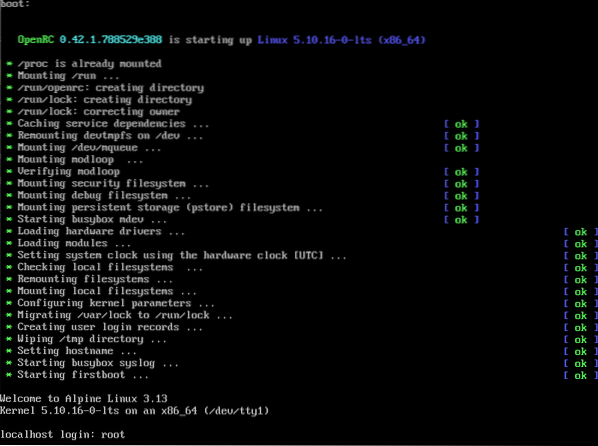
Now to initialize the setup process, type in “setup-alpine” as shown in the image:

Next, you will be asked to select the keyboard layout. As you can see, there are tons of layout options available to choose from. First, you will need to pick the keyboard layout and then the variant. We have picked the “us” keyboard layout and the “us” variant.
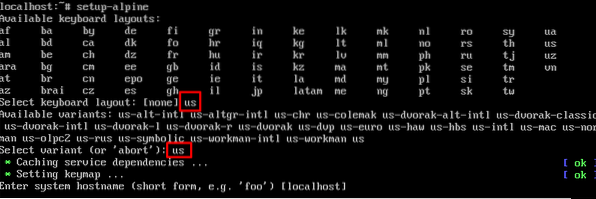
After selecting the keyboard layout, you will be asked to create the “system hostname.” Note that there's already a value inside the square brackets, which in this case is “localhost.” This is the default value for the current option, and if you press “return” without providing a hostname, it will take it as the hostname.
Also, you are only allowed to use lowercase letters, numbers, and a dash (-) in the hostname. Uppercase letters or any other symbols are not allowed, as you can see from this image.

Once done, you will be presented with the available interfaces and asked to initialize any one of them.
Since eth0 is the only available interface, we will be initializing it. It's selected by default as it's provided inside the square brackets. So all we need to do is hit Enter.
Next, we will need to set up an IP address for the interface. By default, it's DHCP, and we will be using it, so just hit Enter.
And finally, it will ask whether you want to do any manual network configurations. Since we are just installing it on our virtual machine, it won't be necessary.

After going through all of the above steps, you will be required to create a new password.

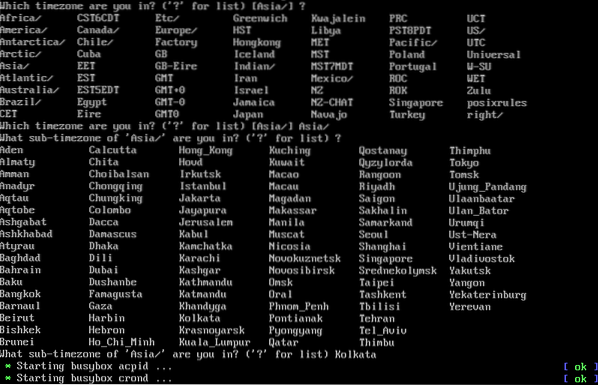
Next, you will be asked to specify which timezone you live in. If you're not sure, you can type in “?” for a list of all time-zones and then enter yours.
Then you will be asked whether or not you want to set up a proxy. In this tutorial, we won't.
After that, you will need to select which NTP client you want to use. Available options include busybox, openntpd, and chrony. Chrony is selected by default, and we will be using it.
Next, you will need to select an SSH server with available options being OpenSSH and dropbear. Here, too, we will be going with the default option - OpenSSH.
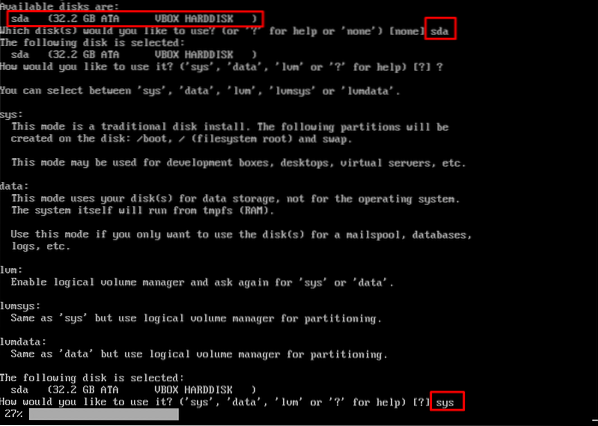
Now, you will need to select which disk you wish to flash Alpine Linux on. By default, it is selected as “none.” This means that Alpine won't be installed on the disk and will run on RAM.
If you want to do that, then okay. Or else, select the disk from the available options and hit Enter.
After selecting the disk, you will then be asked how you wish to use the disk - as sys or data or lvm.
“Sys” represents the traditional disk installation method, and we will be using that.
“Data” only uses the selected disk for data storage, whereas the OS is run off the RAM.
“Lvm” will enable the Logical Volume Manager, after which you will again be asked how you wish to use the disk - as sys or data.
Finally, the installation process will commence and will hardly take a minute or two based on your configuration. Now to finalize, it will ask you to reboot your system.

Step 3: Setting Up Alpine Linux
With Alpine Linux installed, it's time for the first boot.
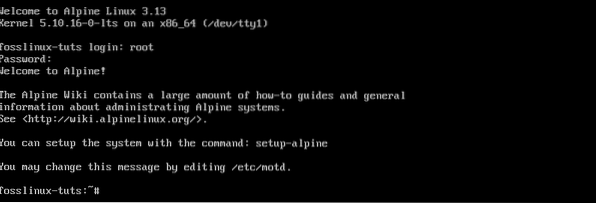
Remember to login in as “root” as it's the only available username right now. In case you wish to create/add a new user, enter the following command:
adduser
Once you run this, it will ask you to type in a password for the new user, and voila! - a new user has been created.

Next, let's give you a look at how lightweight the Alpine Linux distro really is. For this, we will be using the top task manager.
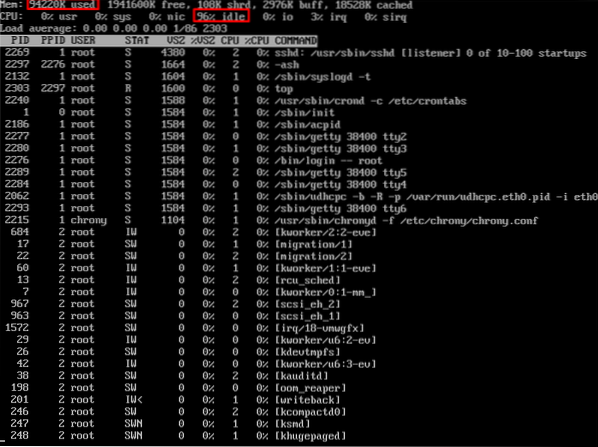
As you can see, the distro takes up meager resources.
Also, after your first boot, you will want to set up your system properly. Depending on your needs and requirements, you will want to install various packages for which you will need APK.
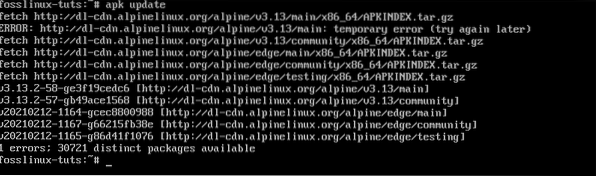
So let's update APK with the following command:
apk update

And this will show you all the available packages, which is currently 4688. This seems too little. Thankfully we can fix it by tweaking /etc/apk/repositories.
First, we will need to install a new text editor, which should also be a nice way to show you how APK works. Just type in the following command, and the Vim text editor will be installed.
apk add vim
Once Vim is installed, type in the following command to tweak the above-mentioned file.
vim /etc/apk/repositories
In here, you will notice many of the URLs are commented out. Just uncomment all of them as shown in the image.

Once done, again run the apk update command. This time, as you can see, there are many more packages available - 30721, to be exact.
Now that you have access to all the updated packages, you can install the ones you need and start using Alpine.
So, Is Alpine Linux the Perfect Distro for Power Users?
As we discussed so often, the small footprint and advanced security features make Alpine Linux a perfect choice for containers such as Docker. But that being said, the distro will prove efficient for any system that is network-based and dedicated for a single purpose only, like in the case of routers.
However, if you intended to use Alpine Linux for your desktop PC, then it's not going to be a smooth experience. The lack of packages with the default package manager and the fact that it's terminal-based means it's going to bar out many beginners.
As such, Alpine Linux is best suited for professionals and power users who already have a use in mind and are looking for a specialized OS for their niche projects or applications.


