Until recently, Dash to Panel was limited to a single panel that combined application menus, taskbar and system tray. However, a new update for Dash to Panel was released a couple of months back, allowing users to create two panels. Using this new option, you can now emulate the classic GNOME2 layout, featuring a two panel setup for managing system tray and taskbar. This article will explain how to create this two panel layout using Dash to Panel GNOME Shell extension.
Installing Dash to Panel Extension
To install Dash to Panel extension, you must first enable support for installing shell extensions through web browsers.
To enable installation of GNOME Shell extensions in Ubuntu through Chrome, Chromium and Chromium based browsers, run the command below:
$ sudo apt install chrome-gnome-shellTo enable installation of extensions through Firefox browser, install this addon for Firefox.
To enable extension integration in other GNOME Shell based Linux distributions, follow instructions available here.
Now to install Dash to Panel extension, simply visit the extension page in Chrome, Chromium, Chromium based browsers or Firefox and toggle it on. When prompted, click on the “Install” button. Once the installation has finished, Dash to Panel should automatically activate. In case you cant see Dash to Panel taskbar, logout and re-login to your desktop. You can also check the status of Dash to Panel extension from “GNOME Tweaks” app that can be installed through the package manager of your Linux distribution.
Configuring Dash to Panel Extension for a Two Panel Layout
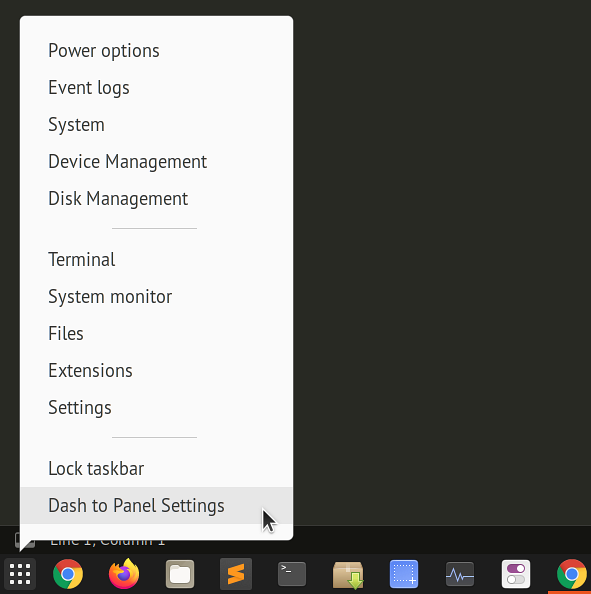
Right click on the app grid icon on the Dash to Panel taskbar. Click on “Dash to Panel Settings”, as shown in the screenshot below:
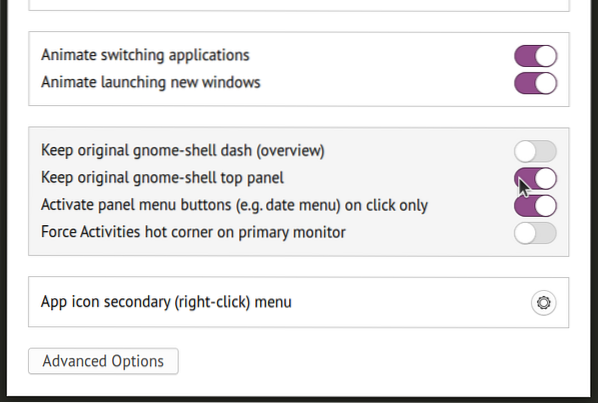
Next, go to “Fine-Tune” tab and toggle on “Keep original gnome-shell top panel” option, as shown in the screenshot below:
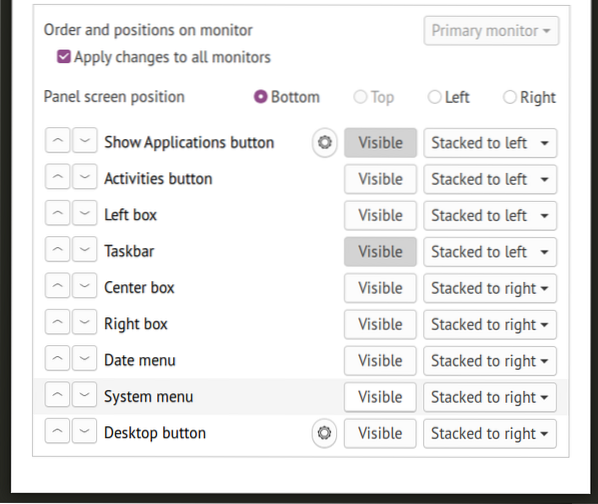
You will now get a two panel layout with the original top panel remaining intact. The second panel, where the taskbar resides, may get duplicate system tray icons same as the top panel. To disable these icons, go to “Position” tab in Dash to Panel Settings and change visibility of individual elements, as shown in the screenshot below:
Your Dash to Panel two panel layout now should be complete. Note that by default, Dash to Panel uses an “icon only” taskbar. To get classic panel layout where each running app's label is also shown, some more tweaks are needed.
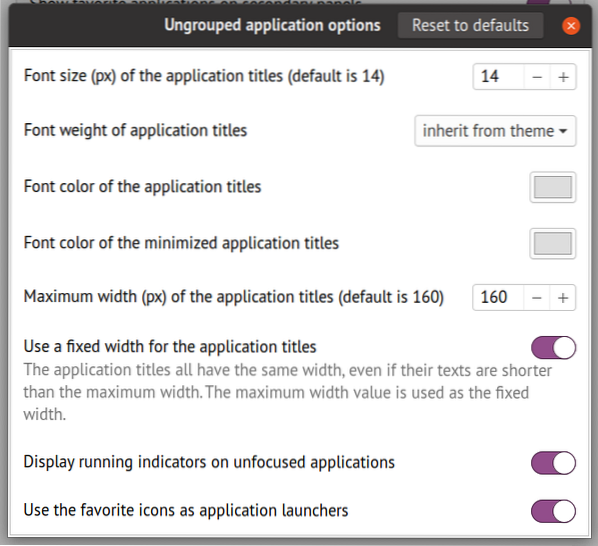
Go to the “Behavior” tab and click on “Ungroup applications”.
You should now have a taskbar that shows both icons and labels for running apps, improving readability and accessibility. You can further tweak the behavior of taskbar labels by clicking on the cog icon just next to “Ungroup applications” toggle button.
Final Result
Here is a screenshot of Dash to Panel two panel layout on my desktop. After following the instructions above, you should get a layout identical to this screenshot. The bottom panel also allows you to show your favorite (pinned) apps, similar to the two panel layout commonly seen in classic GNOME setup and MATE desktop environment.
Conclusion
Many Linux users prefer the “classic GNOME” session where a two panel layout is provided using some extensions. These extensions are fairly basic and do not provide many customization options. Underneath, the classic session also uses GNOME shell session so there is no major advantage using it as far as performance is concerned. You may very well use Dash to Panel extension to get a two panel layout without installing an extra session that needs to be switched from the login screen.


