In the information technology world, security is a major concern these days. Every day new and sophisticated attacks are launched against organizations. System administrators use different ways to harden the security of their servers. One of the common ways to interact with a server is using the SSH (or Secure SHell) protocol which is widely used for remote logging to a server. Besides remote shell logins, it is also used for copying files between two computers. Unlike other methods like telnet, rcp, ftp, etc., SSH protocol uses an encryption mechanism to secure the communication between two hosts.
The security provided by the SSH protocol can be further enhanced by using two-factor authentication. This will further put a strong wall between your host computer and the attackers. To connect to your remote server with SSH, you will require a password as well as a verification code (or OTP) from an authenticator application running on your mobile device. This is really helpful if an attacker steals your password, he will not be able to login into your server without the verification code.
There are many authenticator applications available for mobile devices running Android or Apple IOS. This guide has used the Google Authenticator application for both the Fedora server and the mobile device.
What we will cover
This guide will see how we can use two-factor authentication with SSH protocol to prevent unauthorized access to our Fedora 30 workstation. We will try to log in to our Fedora server from the Xubuntu client machine to see if the setup is working as expected. Let's get started to configure SSH with two-factor authentication.
Prerequisites
- A Fedora 30 OS installed on the remote server with a 'sudo' user account.
- A Xubuntu machine for accessing the above server.
- A mobile device with a Google-Authenticator application installed on it.
Setup Overview
- Fedora 30 machine with IP: 192.168.43.92
- Xubuntu machine with IP: 192.168.43.71
- Mobile device with Google-Authenticator application.
Step 1. Install Google-Authenticator on Fedora 30 server using the command:
$ sudo dnf install -y google-authenticator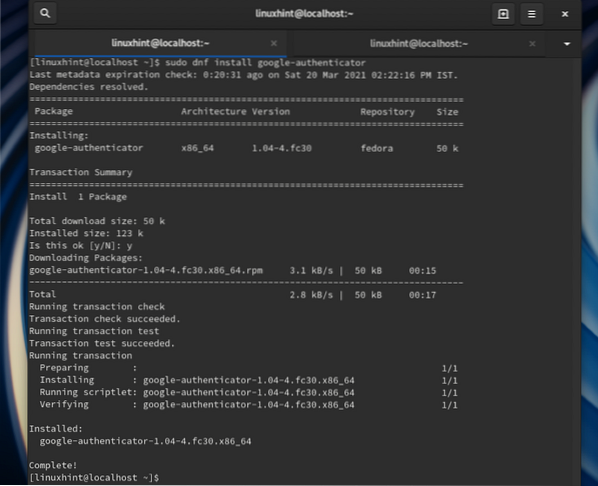
Step 2. Run the below command to start the Google-Authenticator on your server:
$ google-authenticatorIt will ask some questions to configure the server to work with your mobile device:
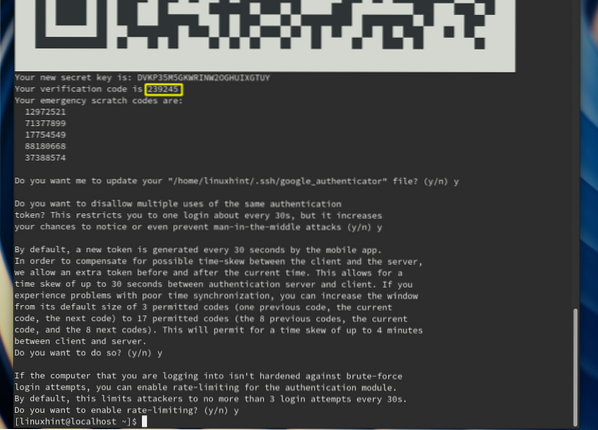
Do you want authentication tokens to be time-based (y/n) y [Enter' Y' here]It will display a QR code on the terminal window; keep this terminal window open for now.
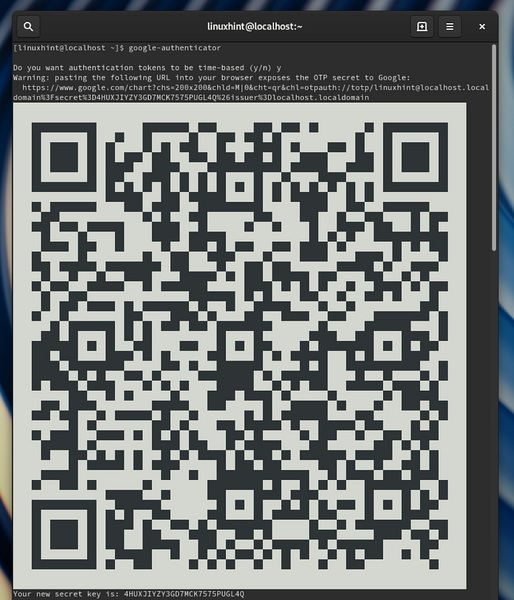
Step 3. Install the Google-Authenticator app on your mobile device and open it. Now click the option 'Scan a QR code.' Now focus your mobile camera on scanning the QR code on the terminal window of your server.
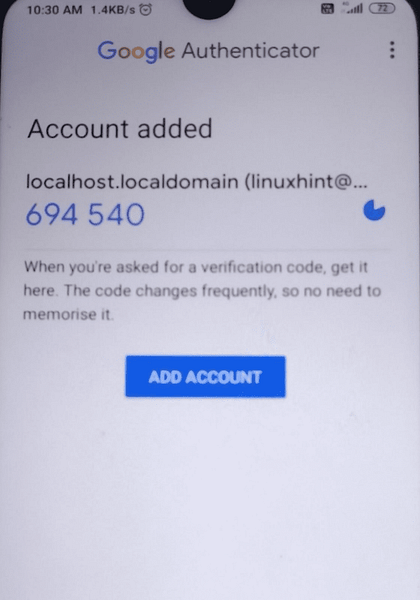
Step 4. After scanning the QR code, your mobile device will add an account for your server and generate a random code that will keep changing with a rotating timer, as shown in the picture below:
Step 5. Now head back to your server terminal window and enter here the verification code from your mobile device. Once the code is confirmed, it will generate a set of scratch code. These scratch codes can be used to login to your server in case you lose your mobile device. So, save them in some secure place.
Step 6. In the further steps, it will ask some questions to finish the configuration. We have given below the set of questions and their answers to configure the setup. You can change those answers as per your need:
Do you want me to update your "/home/linuxhint/.google_authenticator" file? (y/n) y [Enter 'y' here]Do you want to disallow multiple uses of the same authentication token? This restricts you to one login about every 30s, but it increases your chances to notice or even prevent man-in-the-middle attacks (y/n) y [Enter 'y' here]
By default, a new token is generated every 30 seconds by the mobile app.To compensate for possible time-skew between the client and the server, we allow an extra token before and after the current time. This allows for a time skew of up to 30 seconds between the authentication server and client. If you experience problems with poor time synchronization, you can increase the window from its default size of 3 permitted codes (one previous code, the current code, the next code) to 17 permitted codes (the 8 previous codes, the current code, and the 8 next codes). This will permit for a time skew of up to 4 minutes between client and server. Do you want to do so? (y/n) y [Enter 'y' here]
If the computer that you are logging into isn't hardened against brute-force login attempts, you can enable rate-limiting for the authentication module. By default, this limits attackers to no more than 3 login attempts every 30s. Do you want to enable rate-limiting? (y/n) y [Enter 'y' here]
Step 7. Now open the sshd_config file with any editor
$ sudo vi /etc/ssh/sshd_configand do the following steps:
- Uncomment and set the PasswordAuthentication to yes.
- Uncomment and set the ChallengeResponseAuthentication to yes.
- Uncomment and set the UsePAM to yes.
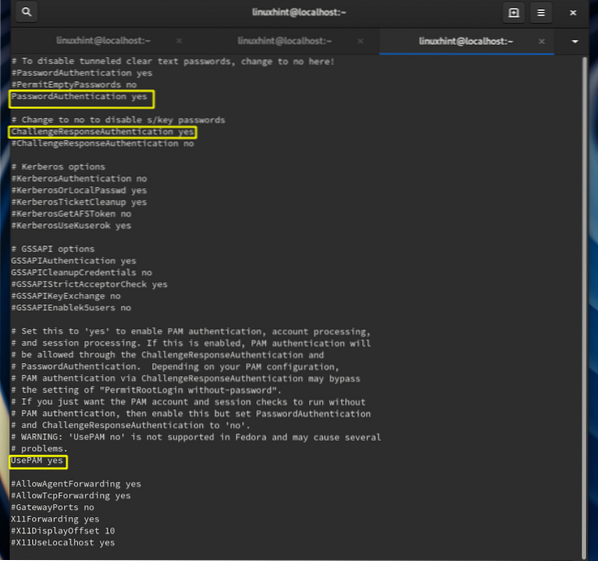
Save and close the file.
Step 8. Next, open the /etc/pam.d/sshd file
$ sudo vi /etc/pam.d/sshdand add the following lines below the line 'auth substack password auth:
auth required pam_google_authenticator.so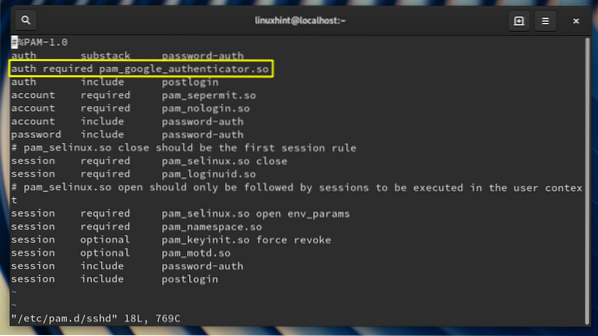
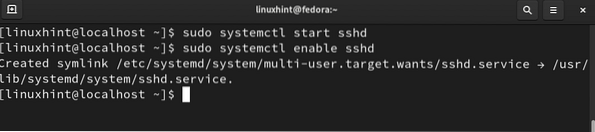
Step 9. Start and enable the SSH service on the Fedora server with the command:
$ sudo systemctl start sshd$ sudo systemctl enable sshd
All the steps for configuring the server are now done. We will now move to our client machine, i.e., Xubuntu, in our case.
Step 10. Now try to login with SSH from Xubuntu machine to Fedora 30 server:
$ ssh [email protected]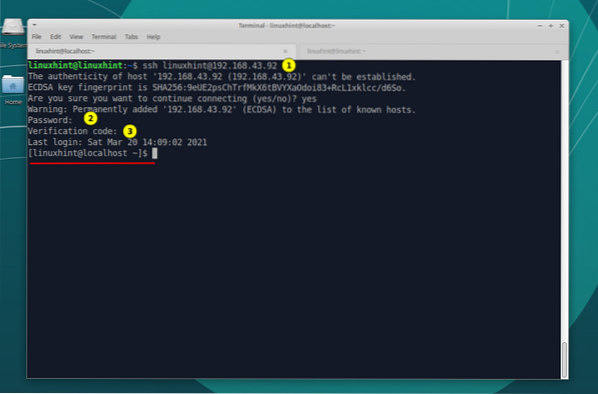
As you can see, the SSH is first asking for the server's password and then a verification code from your mobile device. Once you have entered the verification code correctly, you can log in to the remote Fedora server.
Conclusion
Congratulations, we have successfully configured the SSH access with two-factor authentication on Fedora 30 OS. You can further configure SSH to use only a verification code to login without the remote server password.


