FFmpeg is not offered in the default repositories of Centos 8. You may opt to build FFmpeg utilities from the source or install them from the Negativo17 directory via DNF. In this article, we'll move ahead with the second choice. It is also the fastest way to implement FFmpeg on the Centos 8 OS.
The installation process for FFmpeg in Centos 8 is as follows:
Install Epel Repository
There are two directories that we will depend on to install FFmpeg on Centos 8. The first is an EPEL directory containing a lot of extra packages that are not delivered with the Centos 8 base media installation.
First of all, you will have to check whether your Centos 8 has an epel repository installed and enabled or not. For this purpose, execute the following command:
$ sudo yum repolistYou can see that no Epel repository is installed in the system, as shown in the image below.

In Centos 8, you could install the EPEL directory via YUM or DNF, whatever you are more confident with. You have to implement the cited commands below to install the Centos 8 epel repository.
$ sudo yum install epel-releaseOr
$ sudo yum -y install epel-releaseOr
$ dnf install https://dl.fedoraproject.org/pub/epel/epel-release-latest-8.noarch.rpm
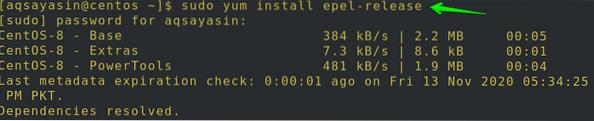
After that, you will be asked to confirm your action by typing “y”, and then hit Enter to continue installation. As a result, the epel repository will be installed in your system.

You will see that the Epel repository is now installed on the system using the Repolist command.
$sudo yum repolist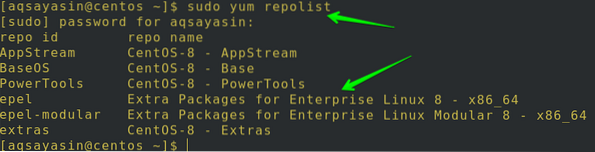
Install RPM Fusion Repository
To deliver tools not delivered by Fedora and Red Hat-based distributions, the RPM Fusion directory was developed. In this directory, all software programs available are supported as precompiled RPM files. Fusion provides two libraries, one open, which we'll be using, and one non-free. Both are available for free download, but the non-free directory contains software that may not be protected by open source licenses.
You may install the RPM Fusion repository by using any of the corresponding YUM commands:
$ yum install https://download1.rpmfusion.org/free/el/rpmfusion-free-release-8.noarch.rpm
$ https://download1.rpmfusion.org/nonfree/el/
rpmfusion-nonfree-release-8.noarch.rpm
If you choose DNF, you may use any of the corresponding commands:
$ https://download1.rpmfusion.org/free/el/rpmfusion-free-release-8.noarch.rpm$ https://download1.rpmfusion.org/nonfree/el/rpmfusion-nonfree-release-8.noarch.rpm
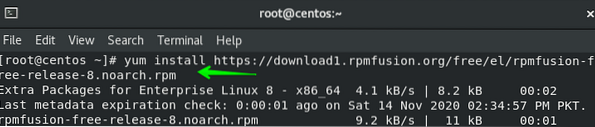
After that, you will be asked to confirm your action. Type “y” and then tap Enter to continue as displayed. You can see that the RPM Fusion repository will be installed in your system. Remember to use YUM or DNF only.

Using the repolist command, you can see that the RPM Fusion repository is now installed in the system.
$ yum repolist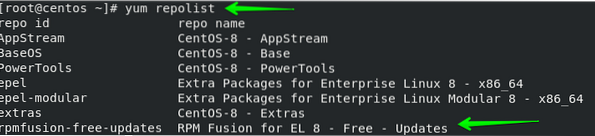
Enable Power Tools
The last part is to activate the power tools in Centos 8 before FFmpeg is installed. For this task, use the following command:
$ sudo dnf config-manager -enable PowerTools
Install FFmpeg
And, here's what you might be looking for! After EPEL and RPM, fusion libraries have been added. We can finally install FFmpeg! Execute the following instructions on your terminal to install FFmpeg and all its components on your Centos 8/RHEL 8 Linux framework.
You may install the FFmpeg and its dependencies by using the corresponding DNF commands:
$ sudo dnf install ffmpeg$ sudo dnf install ffmpeg ffmpeg-devel
You may also install the FFmpeg and its dependencies using the corresponding YUM commands:
$ sudo yum install ffmpeg$ sudo yum install ffmpeg ffmpeg-devel

You will be asked more than one time to confirm your action. Type “y” and then tap Enter to continue as shown. You can see that the FFmpeg tool will be installed in your system.


Verify Installation
Now, you are allowed to see the installed version. Follow one of the two instructions, and on successful installation, you will see a comparable result.
$ rpm -qi ffmpeg$ ffmpeg -version
The latest version of FFmpeg installed in the Negativo17 repository is 4.2.4.

For certain command-line solutions, you can even get assistance from:
$ ffmpeg --helpBasic Conversion:
We'll look at some simple examples in this part to use the FFmpeg feature. The good thing about this is, you may not have to define the input and output types when translating audio and video files while using it. It automatically detects the input file format and guesses the output format from its file extension.
Use the cited command below for the conversion of a video file having extension mp4 to webm:
$ ffmpeg -i input.mp4 output.webmYou can write the name of the input file that you want to convert at the place of 'input.mp4' also you can rename your output file name with “output.webm”.
Use the following command for converting file having extension from mp3 to ogg:
$ ffmpeg -i input.mp3 output.oggYou can write the name of the input file that you want to convert at the place of 'input.mp3', also you can rename your output file name with “output.ogg”.
Using codecs
Just use the -c option to define codecs while transferring files. It may be an authorized decoder/encoder name or a replica of vital importance that merely clones the input.
Used this libvpx video codec as well as libvorbis audio codec to transform a video file from MP4 to Webm:
$ ffmpeg -i input.mp4 -c:v libvpx -c:a libvorbis output.webmTransform an audio file encrypted with Libopus codec from the file having extension from mp3 to ogg.
$ ffmpeg -i input.mp3 -c: a libopus output.oggConclusion:
In this guide, we have explored how to install FFmpeg and how to utilize it in Centos 8. We have seen how to switch on the Epel repository, install the RPM Fusion repository, install the FFmpeg package, verify the installation of FFmpeg, and how to convert one media file to another format. I believe this guide will help you quickly understand the FFmpeg order in Centos 8.


