If you want to hide or remove the NVIDIA Control Panel from the context menu and the notification area in Windows 10, you can use the NVIDIA Control Panel settings or the Registry Editor.
If you are an NVIDIA GPU user, you might have seen the NVIDIA Control Panel option in the right-click context menu as well as the system tray. It shows such entries so that users can open the control panel to make some changes and tweak a few settings. If you have no use for it, you can remove these entries.
Remove NVIDIA Control Panel from Context Menu & System Tray
To remove the NVIDIA Control Panel from the context menu and system tray in Windows 10, follow these steps-
- Search for the nvidia control panel in the Taskbar search box.
- Click on the search result.
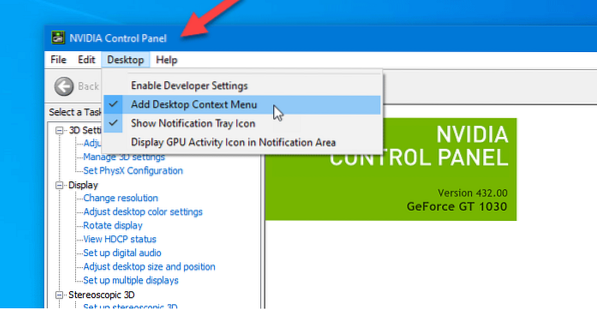
- Click on the Desktop option from the top menu bar.
- Click on Add Desktop Control Menu and Show Notification Tray Icon options.
Let's check out these steps in detail.
At first, you need to open the NVIDIA Control Panel on your computer. For that, you can search for “nvidia control panel” and open the corresponding search result. Otherwise, you can right-click on the Desktop, and select NVIDIA Control Panel from the right-click context menu.
After opening the panel, you should click on the Desktop option visible in the top menu bar. Then, you will find two options -
- Add Desktop Context Menu
- Show Notification Tray Icon.
You need to click on these two options separately to hide the control panel option from the right-click context menu and system tray.
Hide NVIDIA Control Panel from the context menu using Registry Editor

To hide the NVIDIA Control Panel from the context menu using Registry Editor, follow these steps-
- Press Win+R to open the Run prompt.
- Type regedit and hit the Enter button.
- Click Yes in the UAC prompt.
- Navigate to Policies in HKEY_CURRENT_USER.
- Double-click on ContextUIPolicy.
- Set the value as 0.
- Close Registry Editor.
You should backup Registry files and create a System Restore point before making any change in Registry Editor.
To get started, you need to open the Registry Editor on your computer. For example, you can use the Taskbar search box, or you can press Win+R buttons together, type regedit, and hit the Enter button. After that, you have to click on the Yes button in the User Account Control prompt.
Following that, you should find Registry Editor on your screen. If so, you should navigate to the following path-
HKEY_CURRENT_USER\Software\NVIDIA Corporation\Global\NvCplApi\Policies
In the Policies key, you should see a DWORD value called ContextUIPolicy.
You need to change the value data of this DWORD value. For that, double-click on ContextUIPolicy, and set the value as 0.
Now, you can close Registry Editor. After that, you should not find the NVIDIA Control Panel option in the context menu when you right-click on the desktop.
Alternatively, you can create a .reg file with the following text-
Windows Registry Editor Version 5.00 [HKEY_CURRENT_USER\Software\NVIDIA Corporation\Global\NvCplApi\Policies] "ContextUIPolicy"=dword:00000000
Save it as a .reg file and run it. It will do the same job as before.
Related read: How to fix NVIDIA Control Panel not opening.


