This article will show you how to use the Ansible template module and some basics of the Jinja2 templating language. So, let's get started!
Prerequisites
If you would like to try out the examples in this article:
1) You must have Ansible installed on your computer.
2) You must have at least an Ubuntu/Debian host or a CentOS/RHEL 8 host configured for Ansible automation.
There are many articles on LinuxHint dedicated to Installing Ansible and configuring hosts for Ansible automation. You may check these out as well, if needed.
Setting Up an Ansible Project Directory
Before we move on any further, it is a good idea to create a project directory structure, just to keep things a little bit organized.
To create a project directory template-demo/ and all the required subdirectories (in your current working directory), run the following command:
$ mkdir -pv template-demo/playbooks/templates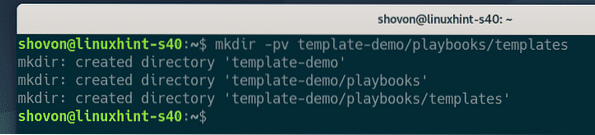
Once the project directory is created, navigate to the project directory, as follows:
$ cd template-demo/
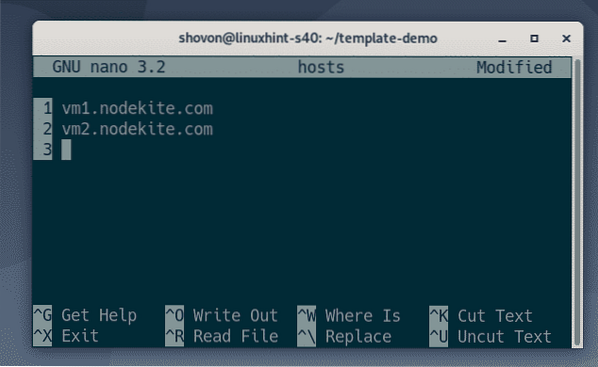
Create a hosts inventory file, as follows:
$ nano hosts
Then, add your host IP or DNS name (vm1.nodekite.com and vm2.nodekite.com) in the inventory file.
Once you are finished with this step, save the file by pressing
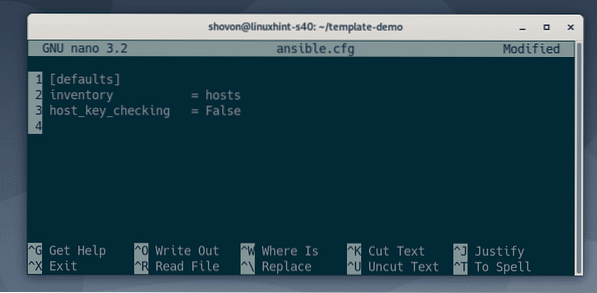
Create an Ansible configuration file in the project directory, as follows:
$ nano ansible.cfg
Then, type the following lines in the ansible.cfg file.
Once have finished this step, save the file by pressing
At this point, the project directory should look as follows:
$ tree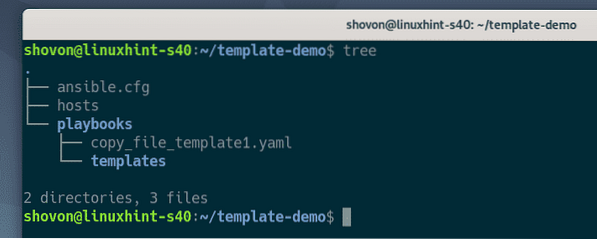
As you can see, the Ansible hosts are accessible, as well. So, we can move on to the next section of this article.
$ ansible all -u ansible -m ping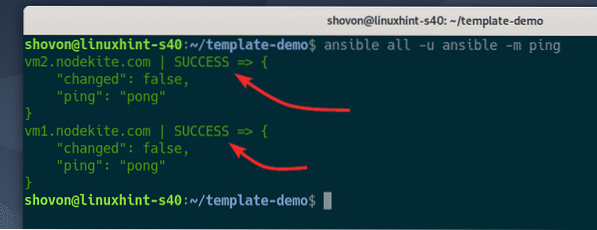
Basics of Ansible Template Module
The template module of Ansible accepts the same options as the copy module of Ansible.
Common Ansible template module options:
src - The path of the Jinja2 template file on your computer, which will be parsed by the Jinja2 templating language and copied to the remote hosts.
dest - The destination path on the remote hosts to which the file will be copied.
owner - The owner of the file on the remote hosts.
group - The group of the file on the remote hosts.
mode - The file permission mode on the remote hosts.
Let us look at an example.
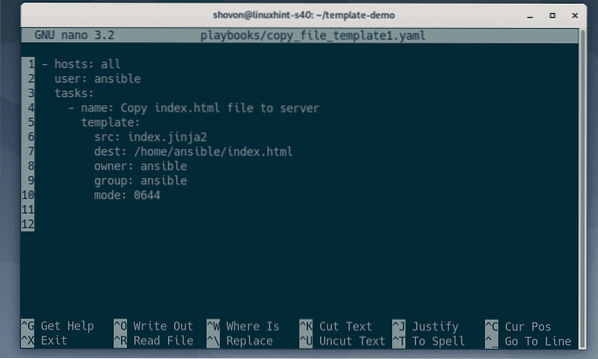
First, create a new Ansible playbook copy_file_template1.yaml in the playbooks/ directory, as follows:
$ nano playbooks/copy_file_template1.yaml
Then, type the following lines in the copy_file_template1.yaml playbook.
- hosts: alluser: ansible
tasks:
- name: Copy index.html file to server
template:
src: index.jinja2
dest: /home/ansible/index.html
owner: ansible
group: ansible
mode: 0644
This playbook will copy the index.jinja2 file from the playbooks/templates/ directory (relative to your project directory) to the remote hosts using the Ansible template module.
Once you are finished with this step, save the file by pressing
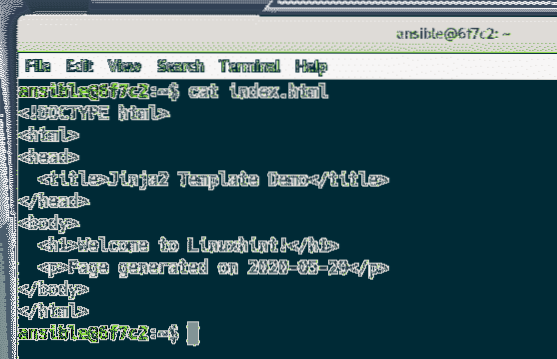
Create the index.jinja2 template file in the playbooks/templates directory, as follows:
$ nano playbooks/templates/index.jinja2
Type the following lines in the index.jinja2 template file:
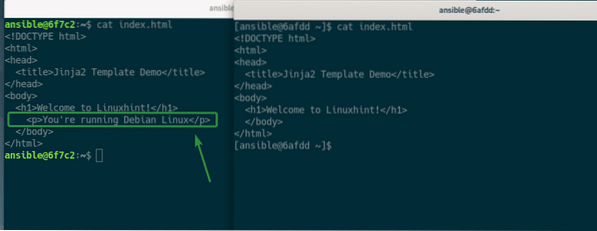
Welcome to Linuxhint!
This is just a plain HTML file. I did not use any fancy Jinja2 syntax here.
Once you are finished with this step, save the file by pressing

Run the playbook copy_file_template1.yaml as follows:
$ ansible-playbook playbooks/copy_file_template1.yaml
The playbook should run successfully.
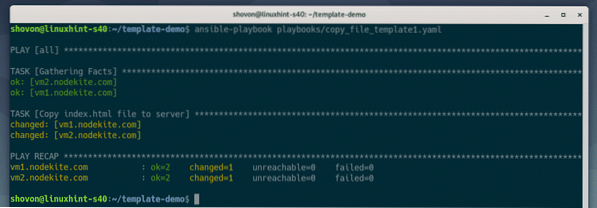
As you can see, the index.jinja2 template was rendered using the Jinja2 templating language. The rendered content should be copied to the index.html file of the remote hosts.

Printing Variables in Jinja2 Template
You can use Ansible facts, variables, and user-defined variables in your Jinja2 templates.
On your Jinja2 template, you can print the value of a variable using the variableName syntax. If the variable is an object, you can print individual object properties using the objectVariable.propertyName syntax.
In the example that follows, we will print the date property of the ansible_date_time object in our index.jinja2 template.
$ ansible all -u ansible -m setup | egrep --color 'date|time'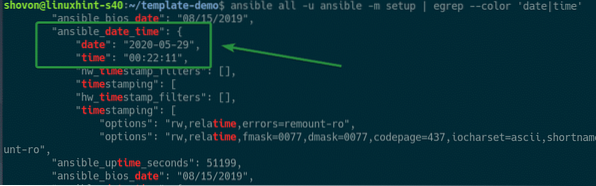
First, open the index.jinja2 template file with the nano text editor, as follows:
$ nano playbooks/templates/index.jinja2
Add the following line to the index.jinja2 template file:
Page generated on ansible_date_time.date
The final index.jinja2 file should look as shown in the screenshot below.
Once you are finished with this step, save the file by pressing

Run the playbook copy_file_template1.yaml as follows:
$ ansible-playbook playbooks/copy_file_template1.yaml
As you can see, the index.jinja2 template was processed by the Jinja2 templating language and replaced the ansible_date_time.date variable with the date in YYYY-MM-DD format. The output was then copied to the index.html file on the remote host.
Conditional if Statement in Jinja2 Template
Jinja2 templating language supports conditional if statements. You can check certain variables before printing anything using the if statement.
The Jinja2 if syntax is as follows:
% if condition %Do something if the condition is true
% endif %
Let us see an example of the Jinja2 if statement.
In this section, I will demonstrate the Jinja2 if statement using the ansible_distribution facts variable.
$ ansible all -u ansible -m setup | egrep --color 'dist'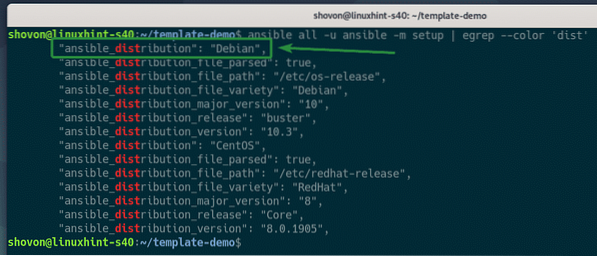
First, open the index.jinja2 Jinja2 template with the nano text editor, as follows:
$ nano playbooks/templates/index.jinja2
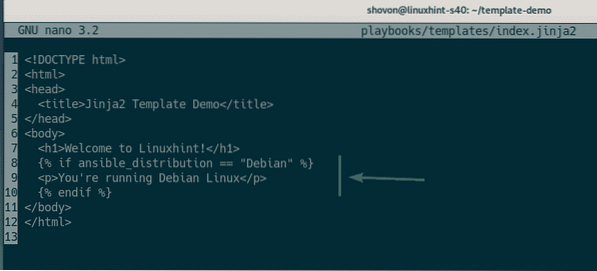
Next, add the following lines in the index.jinja2 template file:
% if ansible_distribution == "Debian" %You're running Debian Linux
% endif %
Here, I have checked if ansible_distribution is Debian. If it is, then print the string You're running Debian Linux
Finally, the index.jinja2 template file should look as shown in the screenshot below.
Once you have edited the file, save the file by pressing
Now, run the playbook copy_file_template1.yaml as follows:
$ ansible-playbook playbooks/copy_file_template1.yaml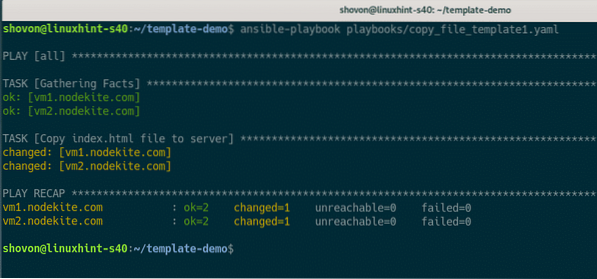
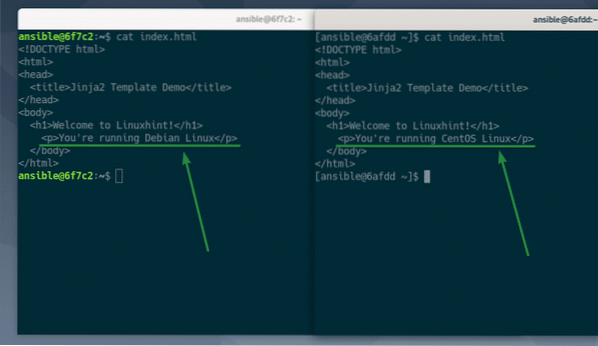
As you can see, on my Debian remote host, the index.html file has the line You're running Debian Linux
Conditional: if-else Statement in Jinja2 Template
Jinja2 templating language supports conditional if-else statements. You can print one thing if the condition matches and print something else if it does not using the if-else statement.
The Jinja2 if-else syntax is as follows:
% if condition %Do something if the condition is true
% else %
Do something if the condition is false
% endif %
Let us see an example of the Jinja2 if-else statement.
First, open the index.jinja2 Jinja2 template with the nano text editor, as follows:
$ nano playbooks/templates/index.jinja2
Next, add the following lines in the index.jinja2 template file:
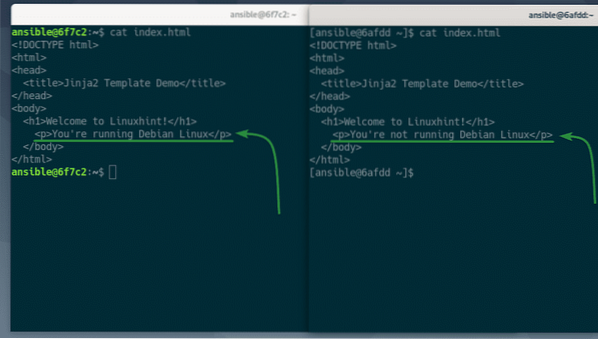
% if ansible_distribution == "Debian" %You're running Debian Linux
% else %
You're not running Debian Linux
% endif %
Here, I have checked if ansible_distribution is Debian. If it is, then print the string You're running Debian Linux You're not running Debian Linux
Finally, the index.jinja2 template file should look as shown in the screenshot below.
Once you have edited the file, save the file by pressing

Run the playbook copy_file_template1.yaml as follows:
$ ansible-playbook playbooks/copy_file_template1.yaml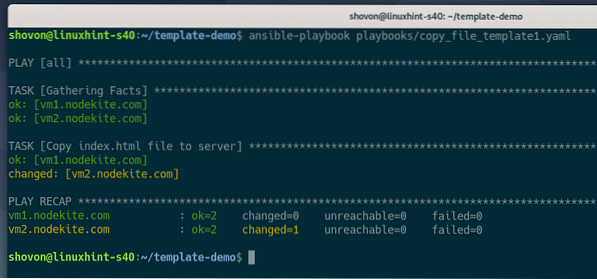
As you can see, on my Debian remote host, the index.html file has the line You're running Debian Linux You're not running Debian Linux
Conditional: if-elif Statement in Jinja2 Template
Jinja2 templating language supports conditional if-elif statements.
The Jinja2 if-elif syntax is as follows:
% if condition1 %Do something if the condition1 is true
% elif condition2 %
Do something if the condition2 is true
% elif condition3 %
Do something if the condition3 is true
…
% elif conditionN %
Do something if the conditionN is true
% else %
Do something if none of the conditions are true
% endif %
Here, the % else % section is optional, but it is there if you need it.
Let us see an example of the Jinja2 if-elif statement.
First, open the index.jinja2 Jinja2 template with the nano text editor, as follows:
$ nano playbooks/templates/index.jinja2
Next, add the following lines in the index.jinja2 template file:
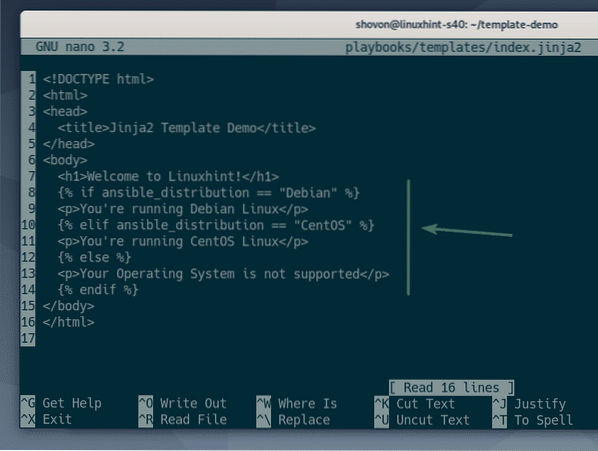
% if ansible_distribution == "Debian" %You're running Debian Linux
% elif ansible_distribution == "CentOS" %
You're running CentOS Linux
% else %
Your Operating System is not supported
% endif %
Here, I have checked if ansible_distribution is Debian. If it is, then print the string You're running Debian Linux
I have also checked if ansible_distribution is CentOS. If it is, then print the string You're running CentOS Linux
Otherwise, print Your Operating System is not supported
Finally, the index.jinja2 template file should look as shown in the screenshot below.
Once you have edited the file, save the file by pressing
Run the playbook copy_file_template1.yaml as follows:
$ ansible-playbook playbooks/copy_file_template1.yaml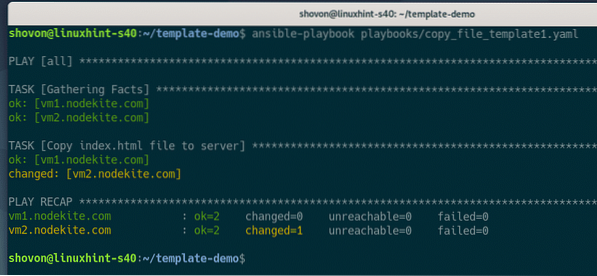
As you can see, on my Debian remote host, the index.html file has the line You're running Debian Linux
On my CentOS remote host, the index.html file has the line You're running CentOS Linux
If I had another remote host running an OS other than Debian or CentOS, it would have the line Your Operating System is not supported
So, the Jinja2 if-elif condition is working.
Loops in Jinja2 Template
You can also print arrays and objects using loops in Jinja2.
The Jinja2 for loop syntax is as follows:
Do something with variableName
% endfor %
Here, in each iteration of the array arrayName, one of the array elements (starting from the beginning of the array) is assigned to the variableName variable. You can do something with this variable inside the loop.
Let us see how you can print array elements in your Jinja2 template in the following example.
First, open the copy_file_template1.yaml Ansible playbook with the nano text editor, as follows:
$ nano playbooks/copy_file_template1.yaml
Next, add the following lines in the copy_file_template1.yaml playbook file:
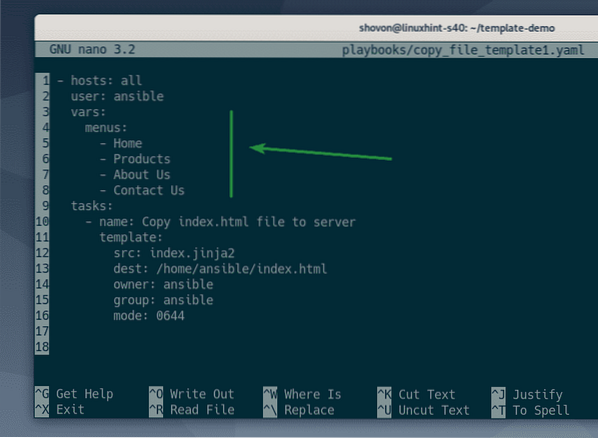
vars:menus:
- Home
- Products
- About Us
- Contact Us
Here, I have added a menus array in the copy_file_template1.yaml playbook. Next, I will print the array elements using a loop in my index.jinja2 Jinja2 template file.
Finally, the copy_file_template1.yaml playbook file should look as shown in the screenshot below.
Once you have edited the file, save the file by pressing
Now, open the index.jinja2 Jinja2 template with the nano text editor, as follows:
$ nano playbooks/templates/index.jinja2
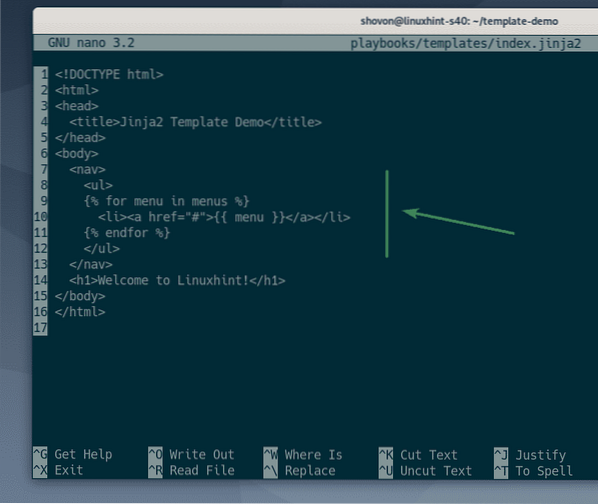
Add the following lines in the index.jinja2 template file:
Here, I am generating a simple HTML navigation bar using a Jinja2 for loop. The loop iterates through the menus array (which I have defined in the copy_file_template1.yaml playbook) elements and generates a menu item in each iteration.
Finally, the index.jinja2 template file should look as shown in the screenshot below.
Once you have edited the file, save the file by pressing
Run the playbook copy_file_template1.yaml as follows:
$ ansible-playbook playbooks/copy_file_template1.yaml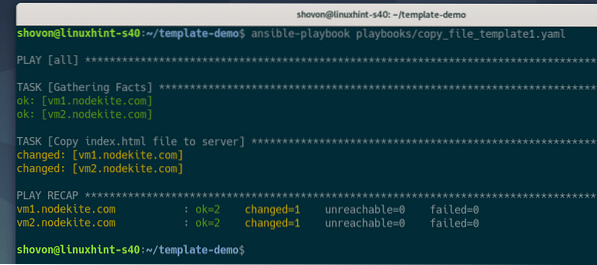
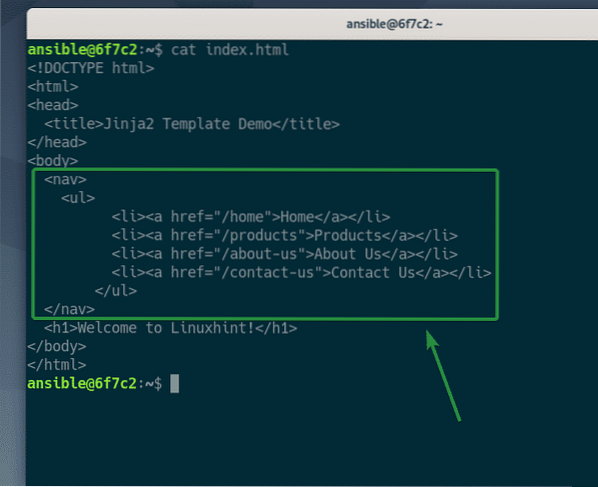
As you can see, the Jinja2 for loop generated an HTML navigation bar (in the index.html file).
You can also access an array of objects in your Jinja2 template.
Let us see another example.
First, open the copy_file_template1.yaml Ansible playbook with the nano text editor, as follows:
$ nano playbooks/copy_file_template1.yaml
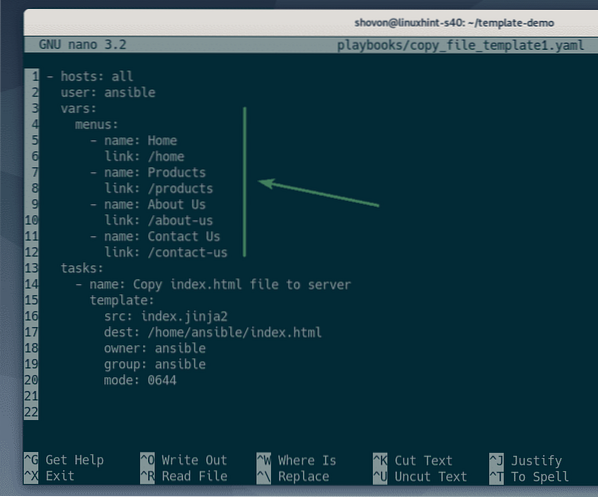
Next, add the following lines in the copy_file_template1.yaml playbook file:
vars:menus:
- name: Home
link: /home
- name: Products
link: /products
- name: About Us
link: /about-us
- name: Contact Us
link: /contact-us
Here, I have added a menus object array in the copy_file_template1.yaml playbook. Each of these objects has two properties, a name property and a link property.
Finally, the copy_file_template1.yaml playbook file should look as shown in the screenshot below.
Once you have edited the file, save the file by pressing
Open the index.jinja2 Jinja2 template with the nano text editor, as follows:
$ nano playbooks/templates/index.jinja2
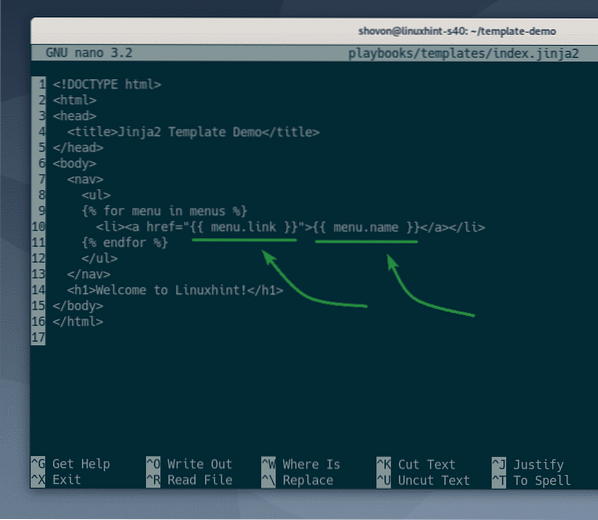
Next, add the following lines in the index.jinja2 template file:
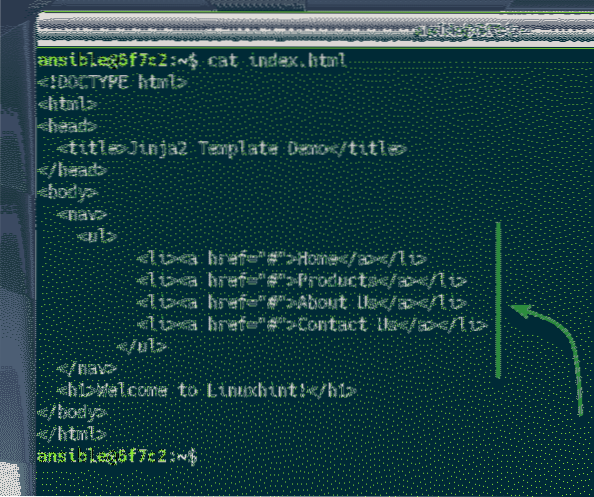
Everything you see here is the same as in the previous example. The only difference is that I am printing the object properties name (using menu.name) and link (using menu.link) in my index.jinja2 Jinja2 template.
Finally, the index.jinja2 template file should look as shown in the screenshot below.
Once you have edited the file, save the file by pressing
Now, run the playbook copy_file_template1.yaml as follows:
$ ansible-playbook playbooks/copy_file_template1.yaml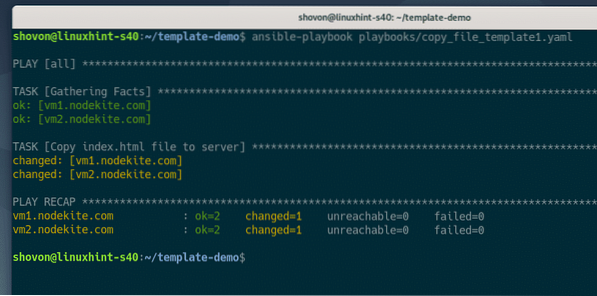
As you can see, the Jinja2 for loop generated an HTML navigation bar (in the index.html file) from an array of objects.
What's Next?
In this article, I have shown you how to use the Ansible template module and described some of the basics of the Jinja2 templating language. Visit the official website of Jinja2 to learn more about the Jinja2 templating language.


