Necessary Methods
The QMessageBox class has many methods for creating various types of message boxes. Some of the more commonly used methods of the QMessageBox class are described below:
| Method Names | Purpose |
|---|---|
| setTitle() | Used to display the custom title. |
| setText() | Used to set the text of the main message. |
| setDetailText() | Used to display a window with a details button; the message text will appear after the user clicks on the button. |
| setInformativeText | Used to display the additional message. |
| setIcon() | Used to set an icon in the message box based on the message type. |
| setWindowTitle() | Used to set the title of the message window. |
| setDefaultButton() | Used to set the button in the message box default; the button will release a clicked signal when the Enter key is pressed. |
| setEscapeButton() | Used to set any button to work as an escape key; the button will release a clicked signal when the Escape key is pressed. |
| setStandardButtons() | Various standard buttons can be used in the message box based on the message type, such as OK, Yes, No, Cancel, Close, etc. |
QMessageBox Usage
The following sections of this tutorial provide examples that will show you how to create different message boxes using the QMessageBox class.
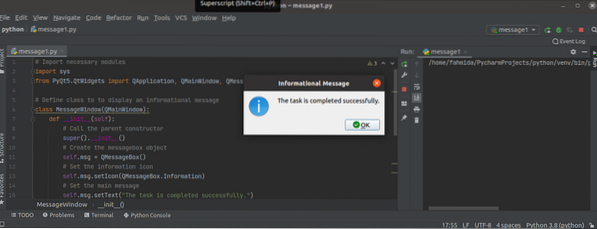
Example 1: Create an Informational Message Box
The following script will create a simple informational message box using the QMessageBox class. This type of message box provides the informational message for the user only. OK is the default button in the message box. Here, QMessageBox.Information is used in the setIcon() method to display the information icon in the message box.
# Import necessary modulesimport sys
from PyQt5.QtWidgets import QApplication, QMainWindow, QMessageBox
# Define class to to display an informational message
class MessageWindow(QMainWindow):
def __init__(self):
# Call the parent constructor
super().__init__()
# Create the messagebox object
self.msg = QMessageBox()
# Set the information icon
self.msg.setIcon(QMessageBox.Information)
# Set the main message
self.msg.setText("The task is completed successfully.")
# Set the title of the window
self.msg.setWindowTitle("Informational Message")
# Display the message box
self.msg.show()
# Create app object and run the app
app = QApplication(sys.argv)
Win = MessageWindow()
app.exec()
The following message box will appear after the above script is executed.
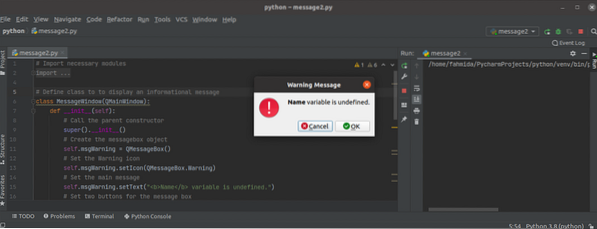
Example 2: Create a Warning Message Box
The following script will create the warning message box using the QMessageBox class. This type of message box provides the warning message for the user. The warning is used in the setIcon() method to display the warning icon in the message box. The OK and Cancel buttons are added to the message box using the setStandardButtons() method. A custom method called msgButton() is defined in the class to trace the button in the message box that has been clicked by the user. If the user clicks the OK button, then the text, 'OK button is pressed,' will print; otherwise, the 'Cancel button is pressed' text will print.
# Import necessary modulesimport sys
from PyQt5.QtWidgets import QApplication, QMainWindow, QMessageBox
# Define class to to display an informational message
class MessageWindow(QMainWindow):
def __init__(self):
# Call the parent constructor
super().__init__()
# Create the messagebox object
self.msgWarning = QMessageBox()
# Set the Warning icon
self.msgWarning.setIcon(QMessageBox.Warning)
# Set the main message
self.msgWarning.setText("Name variable is undefined.")
# Set two buttons for the message box
self.msgWarning.setStandardButtons(QMessageBox.Ok | QMessageBox.Cancel)
# Call the custom method on button clicked
self.msgWarning.buttonClicked.connect(self.msgButton)
# Set the title of the window
self.msgWarning.setWindowTitle("Warning Message")
# Display the message box
self.msgWarning.show()
# Define function for the buttons
def msgButton(self, i):
if i.text() == '&OK' :
print("OK Button is pressed.")
else:
print("Cancel Button is pressed.")
# Create app object and run the app
app = QApplication(sys.argv)
Win = MessageWindow()
app.exec_()
The following message box will appear after the above script is executed.
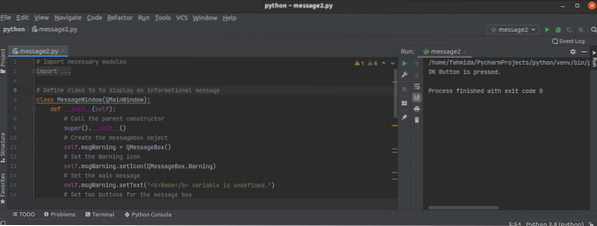
If the user clicks the OK button, the following output will appear.
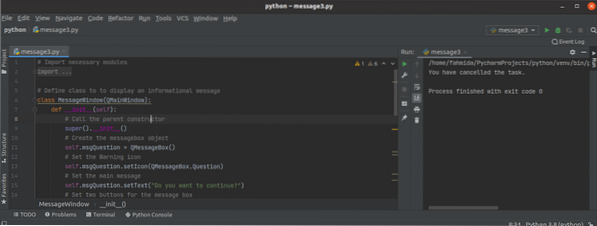
Example 3: Create a Question Warning Message
The following script will create the question message box using the QMessageBox class. This type of message box provides the question message for the user to take the particular action based on the user's decision. Here, QMessageBox.Question is used in the setIcon() method to display the question icon in the message box. The Yes and No buttons are added to the message box using the setStandardButtons() method. The No button is set as the default button using the setDefaultButton() method. A custom method called msgButton() is defined in the class to trace the button in the message box that has been clicked by the user.
# Import necessary modulesimport sys
from PyQt5.QtWidgets import QApplication, QMainWindow, QMessageBox
# Define class to to display an informational message
class MessageWindow(QMainWindow):
def __init__(self):
# Call the parent constructor
super().__init__()
# Create the messagebox object
self.msgQuestion = QMessageBox()
# Set the Warning icon
self.msgQuestion.setIcon(QMessageBox.Question)
# Set the main message
self.msgQuestion.setText("Do you want to continue?")
# Set two buttons for the message box
self.msgQuestion.setStandardButtons(QMessageBox.Yes | QMessageBox.No)
self.msgQuestion.setDefaultButton(QMessageBox.No)
# Call the custom method on button clicked
self.msgQuestion.buttonClicked.connect(self.msgButton)
# Set the title of the window
self.msgQuestion.setWindowTitle("Asking Question to user")
# Display the message box
self.msgQuestion.show()
# Define function for the buttons
def msgButton(self, i):
if i.text() == '&Yes' :
print("The task is continuing… ")
else:
print("You have cancelled the task.")
# Create app object and run the app
app = QApplication(sys.argv)
Win = MessageWindow()
app.exec_()
The following message box will appear after the above script is executed.

If the user clicks the Enter key without selecting any buttons, then the No button will be activated by default, and the following output will appear:
Conclusion
In this tutorial, three different types of message boxes were created using the QMessageBox class. Hopefully, this tutorial helped you to better understand the usage of this class. You should now be able to create a message box for the PyQt application.


