Prerequisites
Before practicing the examples of this tutorial, you have to complete the following tasks.
- Install the Django version 3+ on Ubuntu 20+ (preferably)
- Create a Django project
- Run the Django server to check the server is working properly or not.
Setup a Django app:
Run the following command to create a Django app named model app.
$ python3 manage.py startapp modelappRun the following command to create the user for accessing the Django database. If you have created the user before, then you don't need to run the command.
$ python3 manage.py createsuperuserAdd the app name in the INSTALLED_APP part of the py file.
INSTALLED_APPS = […
'model app
]
Create a folder named templates inside the model app folder and set the template's location of the app in the TEMPLATES part of the py file.
TEMPLATES = [… .
'DIRS': ['/home/fahmida/django_pro/modelapp/templates'],
… .
,
]
Create a model for the database table:
Open the models.py file from the model app folder and add the following script to define the structure of two relational tables. Teacher class is defined to create a table named teachers with name, department, email, and phone fields. Course class is defined to create a table named courses with code, name, credit, and teacher fields. Here, the teacher field of Courses table is the foreign key that will appear from the Teachers table.
models.py
# Import models modulefrom django.db import models
# Create class to define the structure of Teachers table
class Teacher(models.Model):
name = models.CharField(max_length=50)
department = models.CharField(max_length=20)
email = models.EmailField(max_length=100)
phone = models.CharField(max_length=50)
# Create class to define the structure of Courses table
class Course(models.Model):
code = models.CharField(max_length=10)
name = models.CharField(max_length=50)
credit = models.FloatField()
teacher = models.ForeignKey(Teacher, on_delete=models.CASCADE)
Run the makemigrations command to create a new migration based on the changes made by the models.
$ python3 manage.py makemigrations model appRun the migrate command to execute the SQL commands and create all tables in the database defined in the models.py file.
$ python3 manage.py migrateModify the content of the admin.py file with the following content. Here, Teacher and Course classes of the models are registered by using the register() method to display the Teachers and Courses tables in the Django administration dashboard.
admin.py
# Import admin modulefrom django.contrib import admin
# Import the models
from .models import Teacher
from .models import Course
# Register the models
admin.site.register(Teacher)
admin.site.register(Course)
Set URL for admin login:
The path for admin login is defined in the urls.py file for any Django app by default. If the path is not defined in the file, modify the urls.py file with the following script to open the built-in Django Administration Dashboard for the path' admin/'.
urls.py
# Import admin modulefrom django.contrib import admin
# Import path module
from django.urls import path
# Define the path for admin
urlpatterns = [
path('admin/', admin.site.urls),
]
Insert records in the tables:
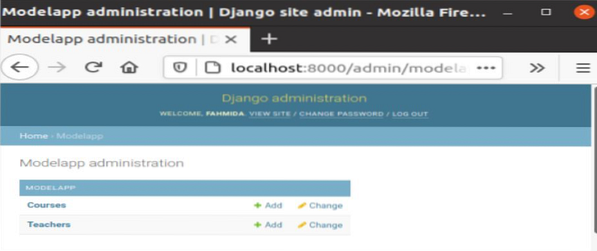
Run the following URL from the browser to open the Django Administration Dashboard.
http://localhost:8000/admin
The following tables will be shown for the model app. Any record of the tables can be read, inserted, updated, and deleted from this page.
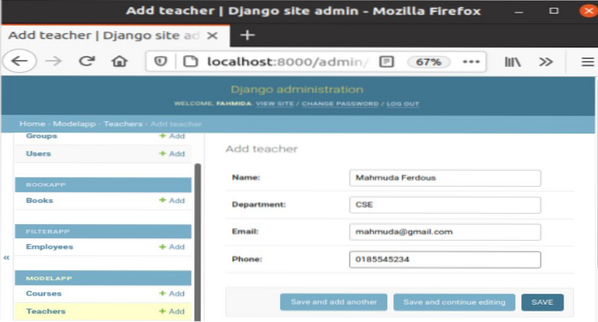
Click on the Teachers table to insert some records into the table. A form with the necessary fields like the following image will appear for inserting record. There are three buttons in the form to insert records in the table. 'Save and add another' button is used to insert the record and open the form again for inserting the next record. The 'Save and continue editing' button is used to insert the record and open the form again with the data for editing. The 'Save' button is used to insert the record only. Every entry form will contain these three buttons.
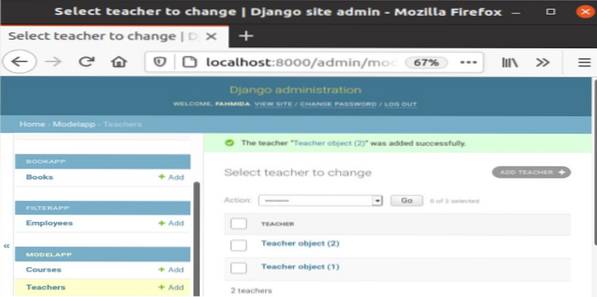
After inserting the two teacher's records, the following information will appear in the browser.
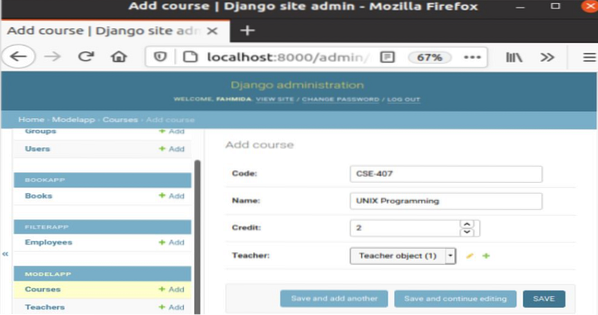
The following form will appear after clicking on the courses table. The Teacher field of the Courses table is related to the Teachers table by the foreign key. The dropdown list with inserted Teacher objects will appear to add the data in this field from the list.
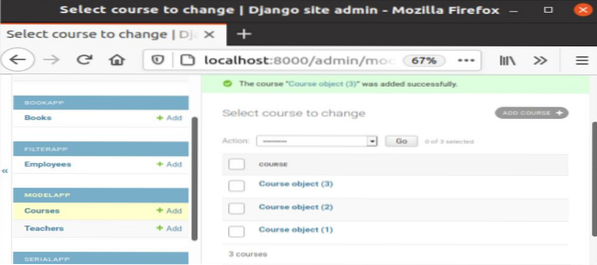
After inserting three records into the Courses table, the following information will appear in the browser. If you want to modify any records of the Courses or the Teachers table, then click on that particular object to open the edit form with the existing data.
You can display the records of both tables in the browser by using the views.py file and creating the temples in the defined template location. You can check the Django View and Django Template tutorials for these.
Conclusion
The table data can be accessed or modified by Django Administration Dashboard, as explained in this tutorial. But the data can be inserted into the tables by writing a script in the views.py file with or without using the template file.