In this article I will show you how to install Blender on Ubuntu and how to get started using it.
Installing Blender on Ubuntu
Update the system before installing the package, and then use standard apt-get to install blender as shown below:
$ sudo apt-get update$ sudo apt-get install blender
If everything went well you will have Blender 2.78 ready to use on your system. You may want to install something newer to be on the bleeding edge. To achieve this you can use the snap version, stable channel is 2.79 and edge channel is 2.80. Because the package is so popular, you can also download an appimage if this suits your situation better.
Start Blender and create your first item
Blender starts with a default cube in the centre of the scene, which you will usually erase the first thing you do. In this case, let's see what we can do to it with some of the quick features available. In object mode, you can change one or more objects at a time. To make sure you have selected the cube, check the edge colour, it turns orange when you choose it.
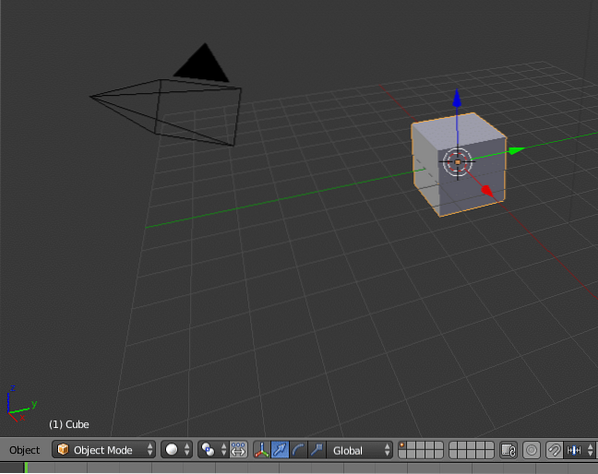
The basic operations on an object are transform, rotate and scale. This time we will scale the cube to make it a plain, for practice. In the object menu, you will find Transform->Scale, click it and see how the cube changes size in all directions equally when you move the cursor around. To make only one dimension change you press the corresponding key. Z for up and down to make it thin and then Shift-Z which means “not- Z”, this changes the two other dimensions. The same goes for all dimensions.
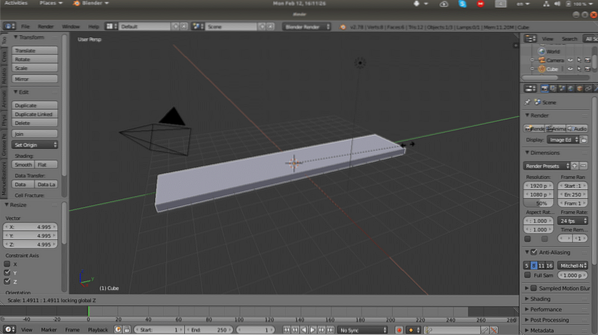
When you have a nice plane you can add a quick feature, choose Objects->Quick Features->Quick Fur, the plank has hair all over it. Remember that you can put a lot of hair on the object but the more hair the longer the render.

Now, it is time to add a second object but before you do that, make sure that it appears where you can see it. To decide where to put the next one, place the cursor right above the surface we made. That is done by right-clicking on the screen where you would like to leave it. As with most things in Blender, you can add objects in two ways: using a menu on the side of the region or a keyboard shortcut. In object mode, the keyboard shortcut to add an object is shift-A.
A drop-down menu appears containing the available objects; choose the sphere. Next, we will use another quick feature: explode. Choose the explode feature the same way you picked the fur and try to run it. You will quickly realize that we have more work to do, the pieces fall down and through the plank. To remedy this, you need to set the collision parameter for both objects, the values are found under the physics tab of each object.
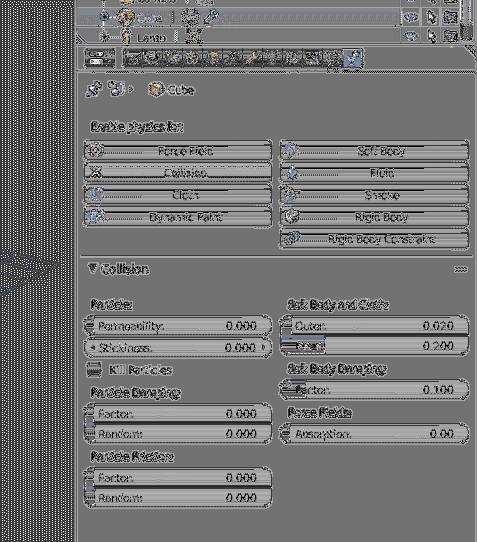
When all this is done you can see the ball explode and bounce on the surface below, the amount of bounce can be adjusted by playing with the other physics parameters of each object. There are many more settings for each object but I leave that up to you to experiment.
Materials in a nutshell
The animation will now work well but it is in grey scale. It is not pretty, so next we will need to add colour and structure to our objects. To make the object look real you need to change what material it is, the simplest action you can take is to open surface and add a node. Default values are already set, the surface is “Diffuse BSDF”. Stick to this value until you have practiced what all the nodes do. Set the color below and set a small roughness, 0.02 is a good starting point.
To describe briefly what nodes do, I need to describe how it is used in most cases. Imagine your surface that the ball lands on, in its original form the plank has one color and no shades. On a real surface there will be unevenness of different kinds, wood will have grains, walls will have bricks and mortar. When you want to add this detail, you start with a flat surface and a base color in the first node and in the next node you add a “Bump Map”. The bump map shows the lines that happen because of the structure of the surface. In this case, you will start with a dark color, use a mixer node and combine it with the bump map of a lighter color.
Some tips on where to learn more
There are several good places to learn more about Blender, and never forget to be active in the communities. I would recommend using the Blender guru videos as a reference for exercises to follow. If you just watch the videos you will forget how to do it. The Blender institute has a lot of resources for you to explore. Another tip is to print the cheat sheet for keyboard shortcuts in the different modes, the shortcuts speed up the work once you have them memorized through training. Finally, this was a very quick introduction, the only way to get good is to practice a lot and read instructions to figure out new things. If that is not enough, use the communities to ask for help.


