Wireshark is the de-facto go-to tool for several network problems that vary from network troubleshooting, security issue examination, inspecting network traffic of a suspicious application, debugging protocol implementations, along with network protocol learning purposes, etc.
The Wireshark project was initiated in 1998. Thanks to the global networking expert's voluntary contribution, it continues to make updates for new technologies and encryption standards. Hence, it's by far one of the best packet analyzer tools and is utilized as a standard commercial tool by various government agencies, educational institutes, and non-profit organizations.
The Wireshark tool is composed of a rich set of features. Some of them are the following:
- Multiplatform: it is available for Unix, Mac, and Window systems.
- It captures packets from various network media, i.e., Wireless LAN, Ethernet, USB, Bluetooth, etc.
- It opens packet files captured by other programs such as Oracle snoop and atmsnoop, Nmap, tcpdump, Microsoft Network Monitor, SNORT, and many others.
- It saves and exports captured packet data in various formats (CSV, XML, plaintext, etc.).
- It provides description support for protocols including SSL, WPA/WPA2, IPsec, and many others.
- It includes capture and display filters.
However, Wireshark won't warn you of any malicious activity. It will only help you inspect and identify what is happening on your network. Moreover, it will only analyze network protocol/activities and won't perform any other activity like sending/intercepting packets.
This article provides an in-depth tutorial that begins with the basics (i.e., filtering, Wireshark network layers, etc.) and takes you into the depth of traffic analysis.
Wireshark Filters
Wireshark comes with powerful filter engines, Capture Filters and Display Filters, to remove noise from the network or already captured traffic. These filters narrow down the unrequired traffic and display only the packets that you want to see. This feature helps network administrators to troubleshoot the problems at hand.
Before going into the details of filters. In case you are wondering how to capture the network traffic without any filter, you can either press Ctrl+E or go to the Capture option on the Wireshark interface and click Start.

Now, let's dig deep into the available filters.
Capture Filter
Wireshark provides support in reducing the size of a raw packet capture by allowing you to use a Capture Filter. But it only captures the packet traffic that matches the filter and disregards the rest of it. This feature helps you monitor and analyze the traffic of a specific application using the network.
Do not confuse this filter with display filters. It's not a display filter. This filter appears at the main window that is needed to set before starting packet capture. Moreover, you cannot modify this filter during the capture.
You can go to the Capture option of the interface and select Capture Filters.

You will be prompted with a window, as shown in the snapshot. You can choose any filter from the list of filters or add/create a new filter by clicking on the + button.
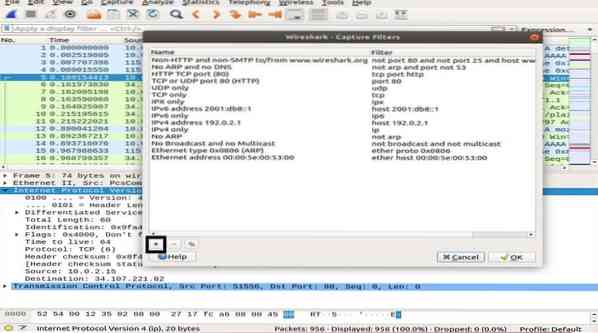
Examples of the list of helpful Capture Filters:
- host ip_address - captures traffic, only between the specific communicating IP address
- net 192.168.0.0/24 - captures traffic between IP address ranges/CIDRs
- port 53 - captures DNS traffic
- tcp portrange 2051-3502 - captures TCP traffic from port range 2051-3502
- port not 22 and not 21 - capture all the traffic except SSH and FTP
Display Filter
Display filters allow you to hide some packets from the already captured network traffic. These filters can be added above the captured list and can be modified on the fly. You can now control and narrow down the packets you want to concentrate on while hiding the unnecessary packets.
You can add filters in the display filter toolbar right above the first pane containing packet information. This filter can be used to display packets based on protocol, source IP address, destination IP address, ports, value and information of fields, comparison between fields, and a lot more.
That's right! You can build a combination of filters using logical operators like ==.!=,||,&&, etc.
Some examples of display filters of a single TCP protocol and a combination filter are shown below:
Network Layers in Wireshark
Other than packet inspection, Wireshark presents OSI layers that aids in the troubleshooting process. Wireshark shows the layers in reverse order, such as:
- Physical Layer
- Data Link Layer
- Network Layer
- Transport Layer
- Application Layer
Note that Wireshark does not always show the Physical layer. We will now dig in each layer to understand the important aspect of packet analysis, and what each layer presents in Wireshark.
Physical Layer
The Physical layer, as shown in the following snapshot, presents the physical summary of the frame, such as hardware information. As a network administrator, you do not generally extract information from this layer.
Data Link Layer
The next data link layer contains the source and destination network card address. It is relatively simple as it only delivers the frame from the laptop to the router or the next adjacent frame in the physical medium.
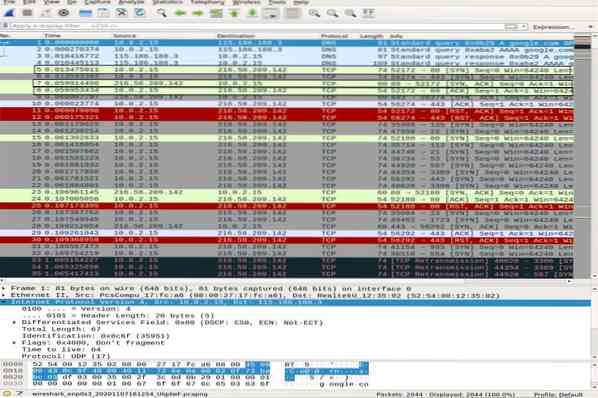
Network Layer
The network layer presents the source and destination IP addresses, IP version, header length, total packet length, and loads of other information.
Transport Layer
In this layer, Wireshark displays information about the transport layer, which consists of the SRC port, DST port, header length, and sequence number that changes for each packet.
Application Layer
In the final layer, you can see what type of data is being sent over the medium and which application is being used, such as FTP, HTTP, SSH, etc.

Traffic Analysis
ICMP Traffic Analysis
ICMP is used for error reporting and testing by determining if the data reaches the intended destination on time or not. Ping utility uses ICMP messages to test the speed of the connection between devices, and report how long the packet takes to reach its destination then come back.
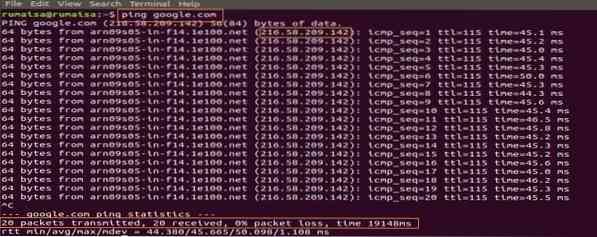
The ping uses ICMP_echo_request message to the device on the network, and the device responds by ICMP_echo_reply message. To capture packets on the Wireshark, start the Capture function of the Wireshark, open the terminal, and run the following command:
ubuntu$ubuntu:~$ ping google.comUse Ctrl+C to terminate the packet capture process in Wireshark. In the snapshot below, you can notice the ICMP packet sent = ICMP packet received with 0% packet loss.
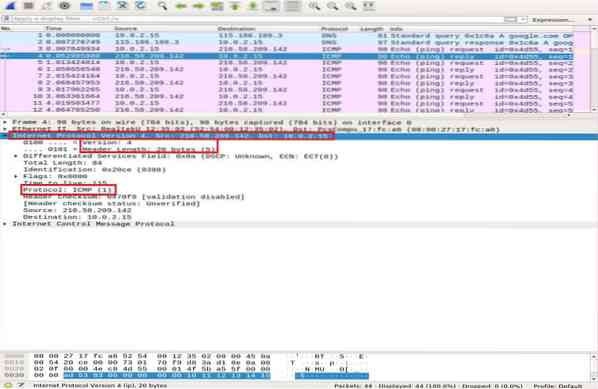
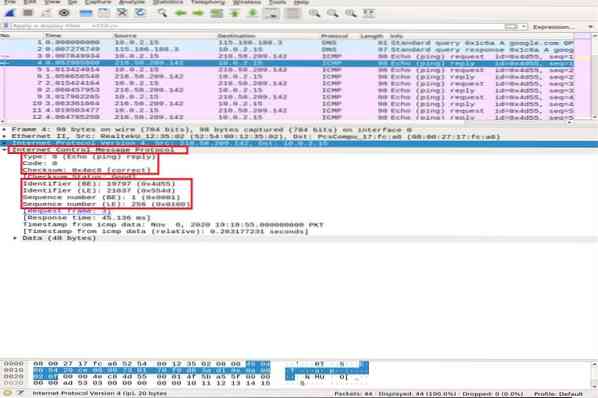
In the Wireshark capture pane, select the first ICMP_echo_request packet and observe the details by opening the middle Wireshark pane.
In the Network Layer, you can notice the source Src as my ip_address, whereas the destination Dst ip_address is of Google server, whereas the IP layer mentions the protocol to be ICMP.

Now, we zoom into the ICMP packet details by expanding Internet Control Message Protocol and decode the highlighted boxes in the snapshot below:

- Type: 08-bit field set to 8 means Echo request message
- Code: always zero for ICMP packets
- checksum: 0x46c8
- Identifier Number (BE): 19797
- Identifier Number (LE): 21837
- Sequence Number (BE): 1
- Sequence Number (LE): 256
The identifier and the sequence numbers are matched to aid in identifying the replies to echo requests. Similarly, before packet transmission, the checksum is computed and added to the field to be compared against the checksum in the received data packet.
Now, in the ICMP reply packet, notice the IPv4 layer. The source and destination addresses have swapped.
In the ICMP layer, verify and compare the following important fields:
- Type: 08-bit field set to 0 means Echo reply message
- Code: always 0 for ICMP packets
- checksum: 0x46c8
- Identifier Number (BE): 19797
- Identifier Number (LE): 21837
- Sequence Number (BE): 1
- Sequence Number (LE): 256
You can notice that the ICMP reply echoes the same request checksum, identifier, and sequence number.
HTTP Traffic Analysis
HTTP is a Hypertext Transfer application layer protocol. It is used by the world wide web and defines rules when the HTTP client/server transmits/receives HTTP commands. The most commonly used HTTP methods ae POST and GET:
POST: this method is used to securely send confidential information to the server that doesn't appear in the URL.
GET: this method is usually used to retrieve data from the address bar from a web server.
Before we dig deeper into HTTP packet analysis, we will first briefly demonstrate the TCP three-way-handshake in Wireshark.
TCP Three-Way-Handshake
In a three-way handshake, the client initiates a connection by sending an SYN packet and receiving an SYN-ACK response from the server, which is acknowledged by the client. We will use the Nmap TCP connect scan command to illustrate TCP handshake between client and server.
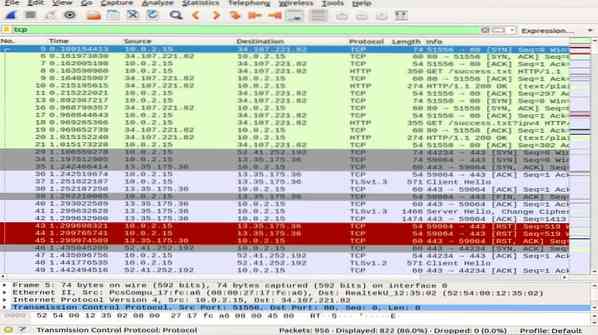
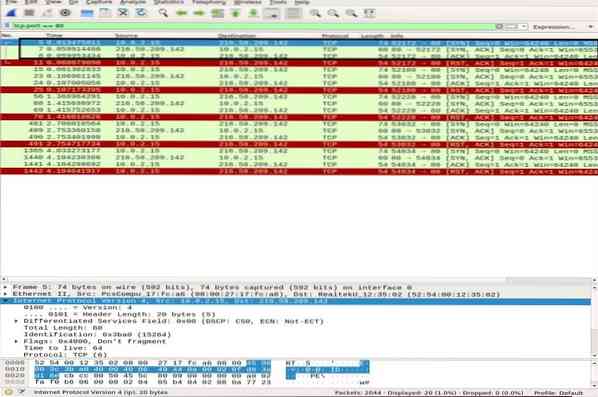
ubuntu$ubuntu:~$ nmap -sT google.comIn the Wireshark packet capture pane, scroll to the top of the window to notice various three-ways-handshakes established based on particular ports.
Use the tcp.port == 80 filter to see if the connection is established via port 80. You can notice the complete three-way-handshake, i.e., SYN, SYN-ACK, and ACK, highlighted at the top of the snapshot, illustrating a reliable connection.
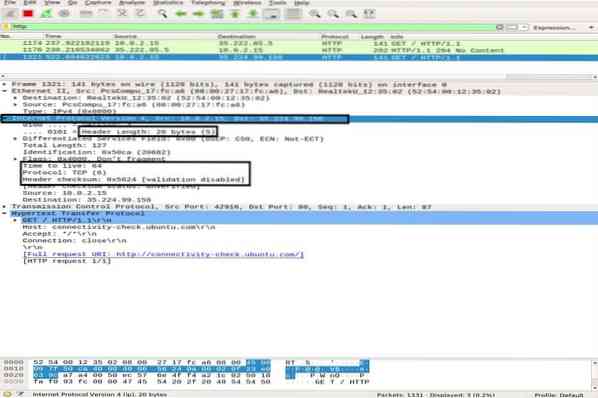
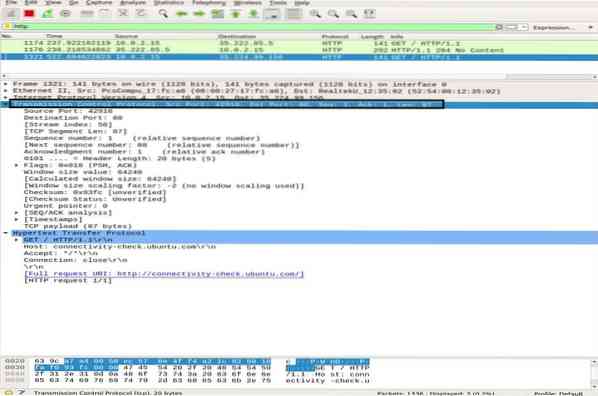
HTTP Packet Analysis
For HTTP packet analysis, go to your browser and paste the Wireshark documentation URL: http://www.wafflemaker.com and download the user's guide PDF. In the meantime, Wireshark must be capturing all the packets.
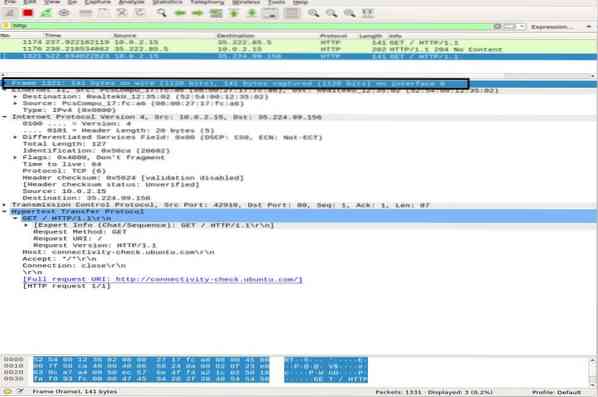
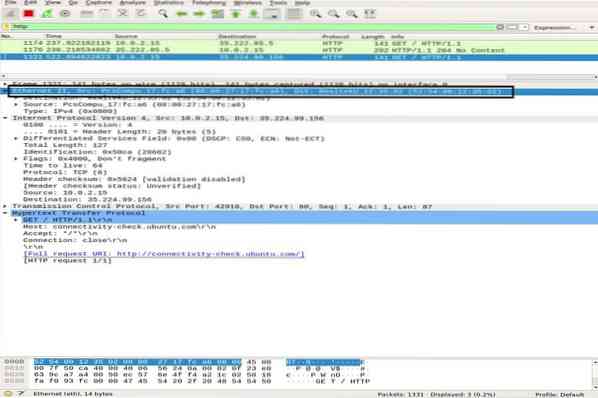
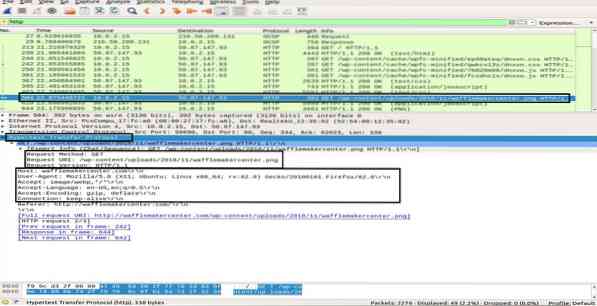
Apply an HTTP filter and look for the HTTP GET request sent to the server by the client. To view an HTTP packet, select it, and expand the application layer in the middle pane. There can be a lot of headers in a request, depending upon the website and browser as well. We will analyze the headers present in our request in the snapshot below.
- Request Method: the HTTP request method is GET
- Host: identifies the name of the server
- User-Agent: informs about the client-side browser type
- Accept, Accept-Encoding, Accept-language: informs the server about the file type, accepted encoding at the client-side, i.e., gzip, etc., and the accepted language
- Cache-Control: shows how the requested information is cached
- Pragma: shows the cookie's name and values the browser holds for the website
- Connection: header that controls whether the connection stays open after the transaction
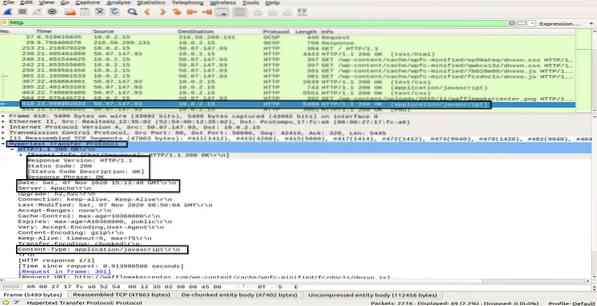
In the HTTP OK packet from server to client, observing the information in the Hypertext Transfer Protocol layer shows “200 OK“. This information indicates a normal successful transfer. In the HTTP OK packet, you can observe different headers in comparison to the HTTP GET packet. These headers contain information about the requested content.
- Response Version: informs about the HTTP version
- Status Code, Response Phrase: sent by the server
- Date: the time when the server received the HTTP GET packet
- Server: server details (Nginx, Apache, etc.)
- Content-type: type of content (json, txt/html, etc.)
- Content-length: total length of content; our file is 39696 bytes
In this section, you have learned how HTTP works and what happens whenever we request content on the web.
Conclusion
Wireshark is the most popular and powerful network sniffer and analysis tool. It is widely used in day-to-day packet analysis tasks in various organizations and institutes. In this article, we have studied some beginner to medium level topics of the Wireshark in Ubuntu. We have learned the type of filters offered by Wireshark for packet analysis. We have covered the network layer model in Wireshark and performed in-depth ICMP and HTTP packet analysis.
However, learning and understanding various aspects of this tool is a long hard journey. Hence, there are a lot of other online lectures and tutorials available to help you around specific topics of Wireshark. You can follow the official user guide available on the Wireshark website. Moreover, once you have built the basic understanding of protocol analysis, it's also advised to use a tool like Varonis that points you at the potential threat and then use Wireshark to investigate for better understanding.


