After installing the XAMPP Control Panel on Windows 10, many users reported encountering an error while starting Apache. This issue commonly occurs when a process like World Wide Publishing Service keeps running in the 80 port of your device. Due to this, the Windows 10 operating system does not allow the Apache server to execute, and that way it causes the error.
5:38:38 PM [Apache] Error: Apache shutdown unexpectedly. 5:38:38 PM [Apache] This may be due to a blocked port, missing dependencies, 5:38:38 PM [Apache] improper privileges, a crash, or a shutdown by another method. 5:38:38 PM [Apache] Press the Logs button to view error logs and check 5:38:38 PM [Apache] the Windows Event Viewer for more clues 5:38:38 PM [Apache] If you need more help, copy and post this 5:38:38 PM [Apache] entire log window on the forumsActually, Port 80 on a computer also used to be the default TCP/IP port that Apaches module uses on XAMPP. And since two different applications can't use the same networking port, therefore you must have to stop it before starting the XAMPP's Apache server. If you're also experiencing this issue on your device, there are a few easy workarounds that I have mentioned in this guide. So, let's get started.
Apache not starting from XAMPP Control Panel
Clearing the World Wide Web Publishing Service would be the best approach to make start the Apache again. However, you can also get it by changing the TCP/IP port number or by stopping the service if needed. So, to fix Apache not starting on XAMPP Control Panel, follow these all possible methods:
- Clear World Wide Web Services
- Change the default Apache TCP/IP port
- Stop World Wide Web Publishing Service
Let us see them in detail.
1] Clear World Wide Web Services
In order to solve the starting problem of the Apache service, you must have to clear the world Wide Web Services from your device. But before begin, ensure that you don't have any app relying on this service.
If everything seems to be okay, open the Control Panel on your Windows system.
Once it opens, select to view the Control Panel in either Large icons or Small icons option, so that you could see all the Control Panel items.
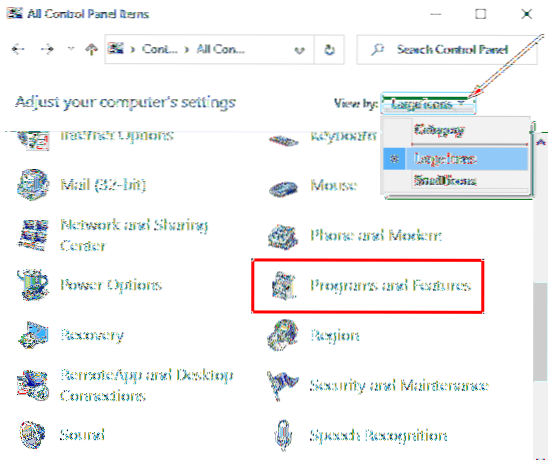
From the available items, select Programs and Features option.
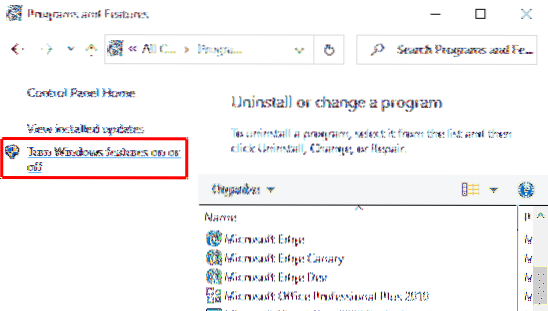
In the left sidebar, there is a link named Turn Windows features on or off, click on it.
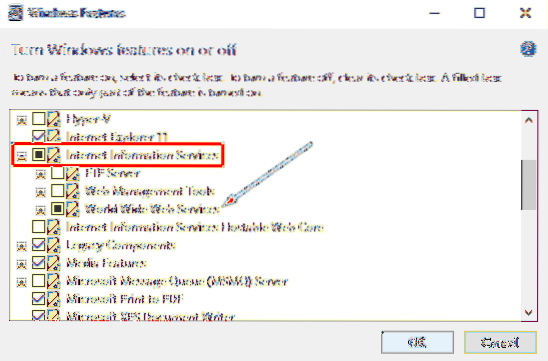
In the Windows Features dialog box, expand the Internet Information Services field.
Now, clear the checkbox regarding World Wide Web Services and then click on the OK button to save the changes.
Once you complete the above steps, reboot your device. After that, open the XAMPP Control Panel and click on the Start button on Apache. It should now run in port 80 on your computer.
2] Change the default Apache TCP/IP port
If due to any reason, the above method workaround doesn't work for you, you need to configure Apache to execute on a different TCP/IP port. So, follow these suggestions:
Open the XAMPP Control Panel on your Windows device.
Click on the Config button of the Apache module.
Select Apache (httpd.conf) option from the list of the pop-up menu.

On the following notepad page, you need to find Listen 80.
To make the search easy, press the Ctrl+F shortcut key. In the pop-up menu, type what you want to search. Mark Wrap around checkbox, leave Match case unchecked, and then click on the Find Next button.

Once you find the respective line, change the port number with any arbitrary number of your choice.
For example, you can try port 121. Then the corresponding result for TCP/IP port number would be something like - Listen 121.
Press Ctrl+S shortcut key to save the changes in the Notepad.
Note: Please note that while using this configuration, you always need to append the TCP/IP port number on the URL you want to connect to your site. For instance, to access the Apache server on your browser, you will need to enter: localhost:121/dashboard rather than localhost/dashboard.
After performing the above steps properly, the starting problem of the Apache in XAMPP would be fixed.
3] Stop World Wide Web Publishing Service
In an alternative way, you need to stop the World Wide Web Publishing Service and change its settings so that the service can only be started manually. So, let's get started:
In order to stop the World Wide Web Publishing Service, you first need to open Windows Services Manager on your Windows 10 PC.
On the Services screen, search for the World Wide Web Publishing Service option under the Name column.
Once you find, double-click on it to open the properties window.
In the properties window, the General tab opens by default.
On the General tab, locate Startup Type and switch it to Manual. This will let you start the service manually when it is required.
Moving ahead, stop the service running status and click on Apply > OK button.
Now, open the XAMPP Control Panel and click on the Start button to run the Apache server.
That's it. I hope this guide would help you to fix the starting problem of the Apache service on the XAMPP Control Panel.


