If you need an Android app for a particular purpose, you can emulate it with a virtual machine. Using Android on your laptop though can have other advantages than just running the specific app. Android is by nature more efficient so you can use it when your specific task needs more memory. If nothing else, it's cool to do it. With Android_x86 you have two options to create a dualboot system.
One is to copy one of the ISO files supplied here, and the other is to install with an rpm package.
To use the rpm package, first start by checking what it will do. In the RPM package there are script files that will set up grub for you. If you want to make sure what it does you can check with the rpm command.
$ rpm --scripts -q android-x86-7.1-r2.x86_64.rpmThe script is written directly to screen, if for some reason the script does not work using apt, copy it to a script file. On an Ubuntu system you will need to use alien to convert the package to deb.
$ sudo apt install alienWith alien installed you can create the deb file. With Alien you can install directly but it is prudent to take two manual steps for this.
$ sudo alien android-x86-7.1-r2.x86_64.rpmNow that you have a deb file, install it using dpkg and install option.
$ sudo dpkg -i android-x86_7.1-1_amd64.debThis installation method will create a directory in your root directory. If you use an ordinary install, this is the partition where you have mounted root (/). The directory will be /android-7.1-r2/, the numbers show the Android version installed. Grub will be able to find this file with its built-in file search.
The second method to install is to boot from a memory stick and run the install from there.
When this is done you have the same directory as in the other method. The script usually creates your Grub entry but if this fails, add it to Grub yourself. Use the below code and place it in /etc/grub.d/40_custom.
menuentry "Android-x86 7.1-r2"search --set=root --file /android-x86 7.1-r2/kernel
linux /android-x86 7.1-r2/kernel quiet root=/dev/ram0 androidboot.selinux=permissive
initrd /android-x86 7.1-r2/initrd.img
For this specific level of the software the parameter 'androidboot.selinux=permissive' is needed or the boot will stop with a panic.
If you have any specific needs, you may need to add other entries to this file. You can share data between versions by using an sdcard image file. To create one, use dd and mount it with mount and fill it with data. Use the loop option with the mount command.
$ sudo dd if=/dev/zero of=/data/sdcard.img bs=1024 count=1048576$ sudo mount -t vfat -o loop /data/sdcard.img sdcard_temp/
Any data you want to have avaliable in the android session can be copied here.
You can now add the kernel parameter to use an sdcard when you start your instance of Android_x86.
linux /android-x86 7.1-r2/kernel quiet root=/dev/ram0 androidboot.selinux=permissiveSDCARD=/data/sdcard.img
Another way to have the same data in two instances of android is to copy the android-[x,x]data directory.
$ sudo rsync -av /cm-x86-13.0-r1/data/ /android-7.1-r2/data/In this example. There is one copy of Cyanogenmod and Android-x86 on the same machine.
When file is saved, you need to update Grub.
$ update-grub2The result will list your installed system, including android. Run a reboot. Your boot screen will look like this: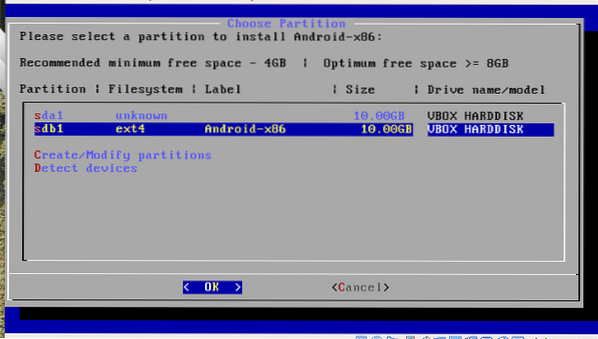
Alternatively, you can create a memory stick and boot from that. Fair warning: This method has all the permissions to do what it wants, with all the risks that entail. As a positive in this, you can put the install on any partition. This is useful if you are low on space on your root (/) drive. A bad aspect is that you have no package update function when you use this method. The method starts with downloading the ISO file, it is available from the android website. http://www.android-x86.org/download
After you have downloaded the ISO, make sure the partition is ready. The ISO file contains tools to partition the disc but it will save you some trouble to prepare before you reboot. To prepare the partition, use your favourite partition program, fdisk is one. Gparted is another. The installer includes cfdisk but has no support for GPT drives, as soon as you have partitioned correctly it works even with a GPT disc.
In the end, when your system is installed, the installed system always reside in a directory on the partition you specified. This means it is very easy to change your Android install from your main distribution.
Choose Android from the menu and wait. The first time you run it, the software will ask you to login. The setup is short and simple and if you choose an existing account, it will try to install applications for you. To restore your applications from before the installer offers to do it but fails quite often. That said; as soon as you are running Android the application you have used before installs beautifully.
Running from VirtualBox
You can also run the entire package from a virtual environment. In Virtualbox, the emulation of the mouse causes some confusion. To move your mouse a round during initial setup you must keep the left mouse button down, once that is done usability improves.
Conclusion
Running Android is not just for tech nerds, it also saves battery life and gives you access to applications only available to Android. Note that many applications check if you have a full phone and refuses to run on anything else than a real device. One example is that you can initiate your Telegram account on an Android emulator; pick a number of any mobile and pick up the activation code for Telegram and you can then use Telegram on the Linux Desktop.


