NumPy (Numerical Python) is an open-source library for the Python programming language. It is used for scientific computing and working with arrays. Apart from its multidimensional array object, it also provides high-level functioning tools for working with arrays. In this post, we will walk you through on how to install NumPy using PIP on Windows 10.
Unlike most Linux distributions, Windows does not come with the Python programming language by default.
To install NumPy using Pip on Windows 10, you first need to download and install Python on your Windows 10 PC. Make sure you select the Install launcher for all users and Add Python to PATH checkboxes. The latter places the interpreter in the execution path.
Once you have the latest Python installed, you can proceed to install NumPy using Pip on Windows 10.
Now, If you are using an older version of Python on Windows, you may need to install PIP manually. Pip is automatically installed with Python 2.7.9+ and Python 3.4+.
You can easily install PIP on Windows by downloading the installation package, opening the command line, and launching the installer. You can install Pip on Windows 10 via CMD prompt by running the command below.
python get-pip.py
You may need to run the Command Prompt as administrator, if you get an error at any point stating that you don't have the necessary permissions to perform a task, you will need to open the app as admin.
Pip installation should start. If the file isn't found, double-check the path to the folder where you saved the file.
You can view the contents of your current directory using the following command:
dir
The dir command returns a full listing of the contents of a directory.
Once you've installed Pip, you can test whether the installation has been successful by typing the following:
pip --version
If Pip has been installed, the program runs, and you should see the following output:
pip 20.1.1 from c:\users\\appdata\local\programs\python\python38-32\lib\site-packages\pip (python 3.8)
Now that you have confirmed you have Pip installed, you can now proceed to install NumPy.
Read: How to open Python PY files on Windows 10.
Install NumPy using PIP on Windows 10
With Pip set up, you can use its command line for installing NumPy.
To install NumPy with the package manager for Python 3, run the following command:
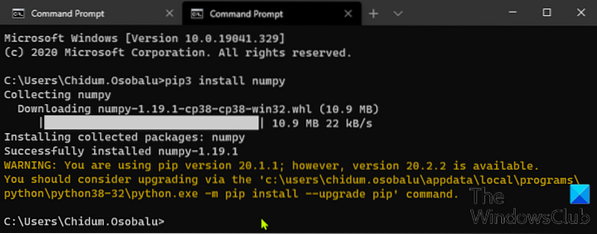
pip3 install numpy
Pip downloads the NumPy package and notifies you it has been successfully installed.
To upgrade Pip on Windows, enter the following in the command prompt:
python -m pip install --upgrade pip
This command first uninstalls the old version of Pip and then installs the most current version of Pip.
After the installation, you can use the show command to verify whether NumPy is now part of you Python packages. Run the following command:
pip3 show numpy

The output should confirm you have NumPy, which version you are using, as well as where the package is stored.
And that's it on how to install NumPy using Pip on Windows 10!


