You can run parted, only from the command line but in two modes; command line and interactive. In interactive mode, you have a new shell with only parted commands, while in the command line, you enter a new command each time. There is also an -s option, so you can run many commands in one go.
Check Before
Before you begin anything, you should make sure that the disk is what you think it is. Use the list option to do this. Note that parted will only show the disks that your user has access to, so you may have to bee root to find your new shiny disk. Also, it shows all disks.
$ parted -lThe list, if you have a new disk, should look something like this:
Model: ATA QEMU HARDDISK (scsi)Disk /dev/sda: 21.5GB
Sector size (logical/physical): 512B/512B
Partition Table:
Disk Flags:
Number Start End Size File system Name Flags
Warning: Unable to open /dev/sr0 read-write (Read-only file system). /dev/sr0
has been opened read-only.
Model: QEMU QEMU DVD-ROM (scsi)
Disk /dev/sr0: 599MB
Sector size (logical/physical): 2048B/2048B
Partition Table: msdos
Disk Flags:
Number Start End Size Type File system Flags
2 19.7MB 116MB 96.5MB primary esp
Notice that there are two disks, the CD and the new hard disk. Observant readers will notice that I am using a virtual machine to run these commands. If you want to print only your disk, you need to use the format below:
$ parted /dev/sda1 - print[root@nixos:~]# parted /dev/sda -- print
Model: ATA QEMU HARDDISK (scsi)
Disk /dev/sda: 21.5GB
Sector size (logical/physical): 512B/512B
Partition Table: gpt
Disk Flags:
Number Start End Size File system Name Flags
3 1049kB 537MB 536MB fat32 ESP boot, esp
1 537MB 19.3GB 18.8GB ext4 primary
2 19.3GB 21.5GB 2147MB primary
Labels
The labels, when using parted, designates the type of partition table you want to use. Make sure you have booted with a UEFI machine if you choose 'gpt'. Your system will not boot if you get this wrong! To check what you have, print the firmware. Confusingly, when you format the disks with mkfs, you can put labels and a different concept.
$ ls sys/firmwareIf it contains an efi line, you are good to go!
acpi dmi efi memmap qemu_fw_cfgIf you see what is below, you have to choose msdos. I am excluding Macs here because I have not yet experience using them.
acpi dmi memmap qemu_fw_cfgNow that you are sure that you have a UEFI implementation on your machine, you can set the label.
$ parted /dev/sda - mklabel gptFor the second case, msdos, you do the same but with another parameter.
$ parted /dev/sda - mklabel msdosNow, you can start creating partitions!
Partitions
For the UEFI case, you need to put some space for the boot or ESP partition. This is where you can put all the booting stuff that UEFI/EFI supports. For this reason, you must leave space in front of the main partition. In this first command, we also add space for a swap partition. Look at the command below:
$ parted /dev/sda - mkpart primary 512MiB -8GiBThis command starts the partition at 512MiB and ends it at 8GiB before the end of the disk. Notice the '-' in front of the second term. For the second case, msdos, you do the same but starting closer to the beginning. The MBR is only up to a 1MiB, including the backup.
$ parted /dev/sda - mkpart primary 1MiB -8GiBIn both cases, your disk will fill everything in between the start and just before the end. This partition will fill the space between the start and end.
$ parted -lTo see what is happening to your disk. Do this between every step until you are confident with what happens.
On the rest of the disk, put your swap partition.
$ parted /dev/sda - mkpart primary linux-swap -8GiB 100%Notice that the procedure does not need to know the size of the disk, as long as it is well over 8 gigabytes. Obviously, based on the size of your swap, you can set the amount of RAM in your case. In a virtual machine, you should probably put a maximum of 2GiB.
Finally, for the UEFI case only, create the UEFI System partition.
$ parted /dev/sda - mkpart ESP fat32 1MiB 512MiBAs you see in this command, you can set the file system for a partition when you create it. You can also set it after you created it.
Filling the Disk
You can fill the disk with parted without knowing its total size. There are many ways to do this, and you saw an example earlier where you put 100% to reach the end of the disk. Other ways to fill your disk is using s; for the sector, %; for the percentage, and chs; for the combined cylinder head and sector. The best part, in this case, is that you can be wrong about where to start, and parted will prompt you for the closest possible solution, and you can answer Yes.
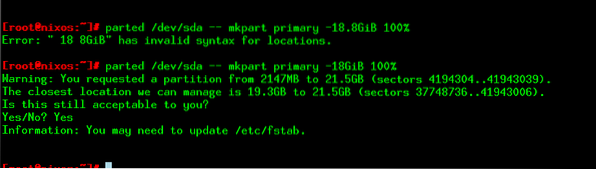
Figure 1: Parted will give you a suggestion when you are wrong.
Setting Flags
In the UEFI case, you want to make sure the ESP is set to be just that by running parted.
$ parted /dev/sda - set 3 esp onYou set all flags this way.
Removing a Partition
Made a mistake? Changing strategy? You can remove partitions, one by one. You can change the number of the partition to choose the correct one.
$ parted /dev/sda - rm 1Nothing adds there.
Rescue
You can also rescue your old disk using the rescue parameter. This works even when you have removed a partition by mistake.
$ parted /dev/sda - rescue 1MiB 20GiBThe action is slow, but it can help you recover from problems. When parted finds something, it will prompt you for action.
Conclusion
Parted is a very powerful way to partition your disk. You can choose to run a command at a time or open a shell.


